Friday, October 29, 2010

How to Make an Omelette Like a Pro

One of my favorite thing to order when I am out for breakfast is omelettes. They come with all kinds of optional ingredients so you can make something unique. I had one a little while back that had chicken sausage, basil, sun dried tomatoes and mozzarella cheese in it and was covered in marinara. I mean there are tons of possibilities. All I can say is experiment with your ingredients. What I will show you here is how to, step by step, assemble the perfect omelette so you can start making these delicious meals without having to go to a restaurant.

IMG_2182

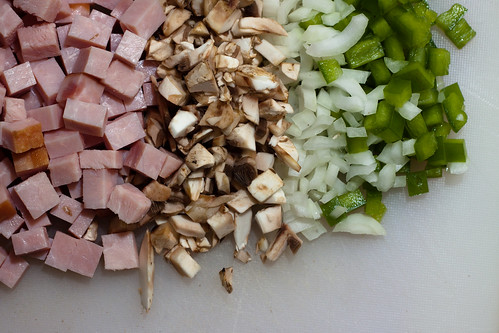
1. Dice up all your ingredients that you plan to use for your omelette. For mine I used onions, mushrooms, green peppers and ham.

IMG_2193

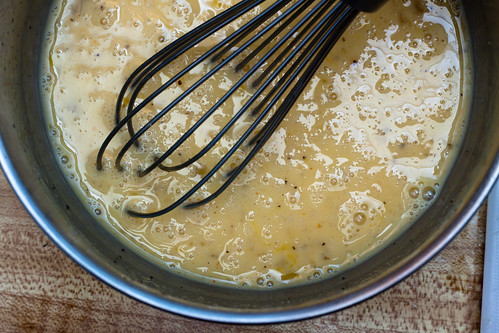
2. Whisk together 3 eggs, a shot of hot sauce (I used Cholula), black pepper and a tablespoon of milk.

IMG_2217

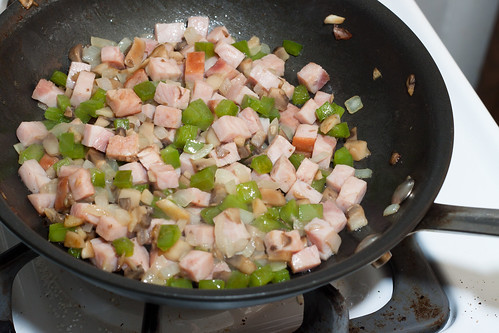
3. In a small saute pan, add 1/2 a tablespoon of butter and cook your omelette's fillings for about 7 - 9 minutes over medium heat.

IMG_2206

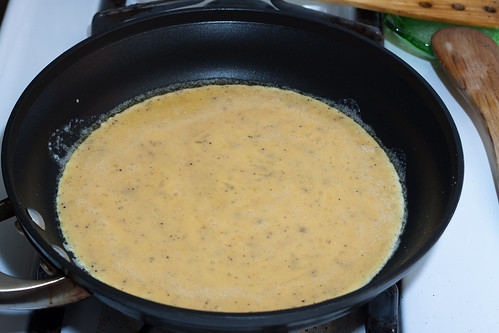
4. Start this step when your filling is about 1/2 way done. In a medium sized saute pan, heat 1/2 a tablespoon of butter over medium heat then add the egg mixture.

IMG_2207

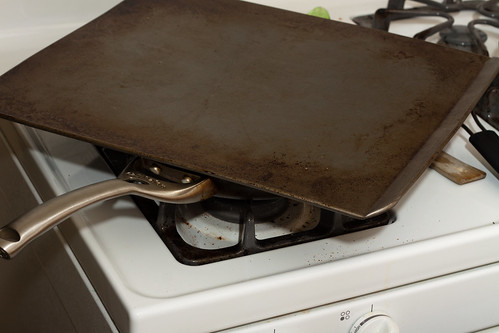
5. Cover the egg mixture with whatever you can. What you are doing here is creating an egg pancake. Flipping this big guy is a pain so if you cover it, the steam will cook the top.

IMG_2219

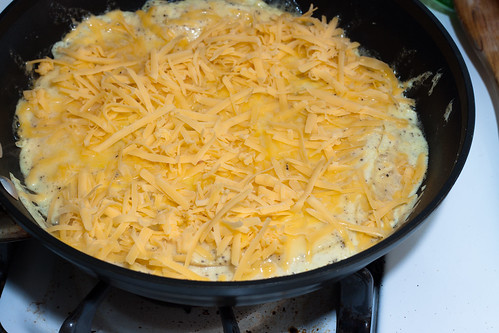
6. After the eggs have been cooking for about 3 - 4 minutes, remove the lip. Lift the edges of your egg pancake and tilt the pan in that direction to allow any uncooked egg to get onto the heat. Do this in 4 different places. Then place cheese on top of the eggs, I used medium cheddar for mine, cover and cook for an additional 2 minutes.

IMG_2221

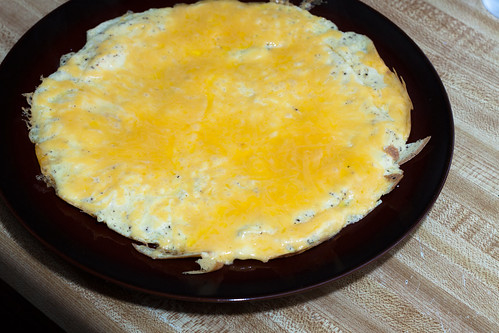
7. Remove from the pan and set in the middle of a plate. Turn off your fillings as well. Now you are ready to assemble.

IMG_2225

8. Place your filling on one side of your eggs.

IMG_2230

9. Fold the unfilled side over and cover with more cheese. Place in the microwave for 1 minute.

IMG_2248

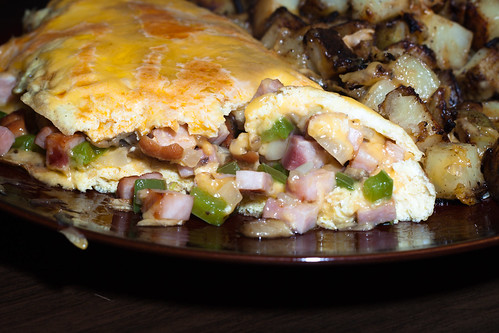
10. Remove from microwave and serve with breakfast potatoes for the which the recipe is below. Enjoy!

** Breakfast Potatoes **

IMG_2234

Ingredients
- 6 tablespoons butter
- 1 tablespoon oil
- 4 russet potatoes, I usually do about 1 per person, cubed
- 1 onion, diced
- 1/2 teaspoon garlic powder
- 1/2 teaspoon garlic salt
- salt and pepper
- cheddar cheese (optional)

The Process
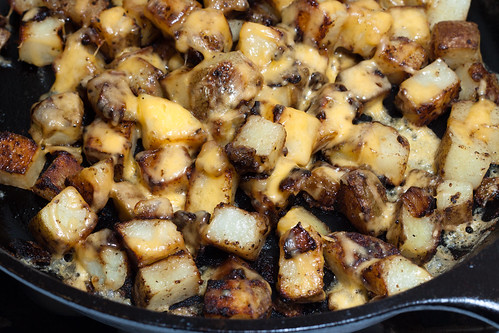
1. In a large cast iron skillet, add the butter and melt over medium heat. Add the potatoes and onions and stir well. Then mix in the garlic powder, garlic salt then season with salt and pepper until it tastes awesome. Preheat over at 350.
2. Cook, stirring occasionally trying to brown the unbrowned sides, for about 25 minutes or until the potatoes are getting soft. Cover with cheese (optional) and set in oven for about 5 minutes. Remove from over.
3. Enjoy!

Thursday, October 28, 2010

Mom's Chicken Casserole

Chicken and Rice Casserole

Now if you know me you know I don't like using boxed anything. I prefer to find out how to make it from scratch because then I feel like it's my own. However there are certain things that you can't just let go of such as my Mom's casserole. I have tried to reproduce it using non boxed ingredients but it never turns out as good. This stuff is ridiculously good and please don't let the picture scare you, it tastes amazing.

If you have any questions please let me know.

Ingredients
- 5 chicken breasts cut into 1/2 inch cubes
- 1 teaspoon garlic powder
- 1 teaspoon salt
- 1 tablespoon oil
- 2 teaspoons pepper, divided
- 2 boxes of Rice a Roni, Herb and Butter flavor
- 2 cans cream of mushroom soup
- 16 ounces sour cream
- 1/2 pound mushrooms sliced
- 1 teaspoon red pepper flakes

The Process
1. Start cooking the Rice a Roni immediately according to package directions. Then add the oil to a large fry pan and add the chicken and season with garlic powder, 1 teaspoon of the pepper and the salt. Cook until the chicken is done. Strain off the fat and juices and set aside. Combine the cream of mushroom, sour cream and pepper flakes in a bowl and mix well.
2. Preheat the oven to 400 degrees. When the Rice a Roni is done it's time to assemble the dish. In a large, greased casserole dish lay the chicken down first, then the uncooked mushrooms, then the rice, then the soup mixture. Place in the oven and bake for about 45 minutes or until you see it bubbling and the top is all golden brown.
3. Remove from oven and let sit for 5 minutes. Then stir it all up. Serve with some fresh groun pepper on top.
4. Enjoy!

Wednesday, October 27, 2010

The Arboretum and Party Time

Peaking Through

Last weekend was crazy I am not going to lie. On Saturday I had an opportunity to go to the Arboretum over by UW while it wasn't raining 1/2 an inch an hour and take some pictures. That place is amazing. I have never been there and it was a real treat to see all the awesome foliage before it all falls off. Not to mention that place is HUGE!!! It is crazy big and I can't beleive how little I actually saw. I was there for 2+ hours and didn't even scratch the surface. I will be going back this Saturday hopefully if I can get the weather to cooperate.

The Crew

I also got to go to a friends party that I haven't seen in a long time. Too long to be honest. I ended up seeing a bunch of peeps that I haven't talked to since I can't even remember when. It was so great to see them all and just get after it. I might have time traveled that night.

Anyways check out the pics and let me know what you think.

Direct Link Arboretum
Direct Link Party

Tortilla Soup with Homemade Tortilla Strips

Tortilla Soup

Wait a second did I hear you just say you've never had tortilla soup? Let's put a stop to this madness right now. This is one of those soups that you shouldn't miss. It has tons of chicken, beans, peppers, corn, avocados and of course tortilla strips. You will be licking the bottom of your bowl and probably going back for seconds. It really is that good.

Now if you won't want to make your own stock that's totally cool but I highly recommend it. You get so much more flavor plus you can use the chicken meat for this dish. Kind of a kill 2 birds with 1 stone type of situation. Also you don't have to make your own tortilla strips and if you choose not to, then I suggest blue corn chips as an alternative. Plus I use pasillo chiles and those can be swapped with anything. So can the beans.

If you have any questions please let me know.

Ingredients
- 10 white corn tortillas cut into strips
- peanut oil for frying
- kosher salt
- 1 tablespoon green tobasco
- 1 red onion, diced
- 2 pasillo chiles, stemmed, seeds removed, diced
- 2 jalapenos, stemmed, seeds removed, diced
- 2 cloves garlic, minced
- 1 tablespoon olive oil
- 1 whole chicken, meat removed and shredded
- 1 can kidney beans, drained and rinsed
- 1 cup frozen corn kernals
- 1 14.5 ounce can tomato sauce
- 8 cups good chicken stock found here
- 2 tablespoons chicken base or cubes if using my stock
- 1 tablespoon chile powder
- 1 teaspoon cumin
- 2 avacados
- 1 cup shredded cheddar
- cilantro, roughly chopped for garnish
- sour cream

The Process
1. In a heavy bottom pot or deep fryer, heat up enough peanut oil to fill up half the pan. When the oil is hot at about 375, add the tortilla pieces and fry the pieces until they are browned stirring to make sure they don't stick. Remove from oil and place on a paper towel to allow the excess oil to drain. Place in a bowl with Tabasco and season with salt and toss well . Set aside.
2. In a large stock pot, add the oil, onion, chilis and garlic over medium high heat and saute, stirring well, for about 8 minutes or until the veggies sweat. Then add the chicken, beans, corn, tomato sauce, chicken stock, (chicken base if needed), chili powder, cumin and mix well. Season with salt and bring to a boil. Reduce to low and simmer for 30 minutes.
3. To serve, place the avocado and fried tortilla pieces in 4 separate bowls. Then ladel the soup into each bowl and cover with cheese, cilantro and a nice scoop of sour cream.
4. Enjoy!

Tuesday, October 26, 2010

Christian's World Famous Meatballs

Spaghetti & Meatballs

Well they might now be world famous but they will be and are pretty damn good if you ask me. Meatballs was one of my all time favorites when I was a kid. Then I kind of went on a vacation so to speak from meatballs for about a decade. Then I started really getting into cooking and realized that meatballs are amazing and I have been missing out. Not to mention that you can do about a hundred different things with these meatballs. I serve them over spagetti, put them on a sandwich or even cram them into a lasagna. The possibilities are endless. Now that I think about it I want to put them in a burrito with tons of cheese and rice.

Anyways you can experiment with this recipe all you want. I know that the traditional method of using eggs for meatballs is 1 egg per pound of meat but I use 2. It seems to keep them softer and more juicy. Also you can experiment with the spices and how you cook them as well. I have seen them put into the sauce raw, deep fried then dropped into the sauce, baked and just put over the noodles then smothered in sauce you can pretty much do whatever you want. You can also make them as big or little as you want.

Hope you like them and please let me know that you think.

Ingredients
- 1 pound ground italian sausage
- 1 pound ground beef
- 1 onion grated
- 4 eggs, lightly beaten
- 1/2 cup grated parmesan
- 1 teaspoon dried basil
- 1 teaspoon dried oregano
- 1 teaspoon black pepper
- 2 teaspoons kosher salt
- 1 teaspoon red pepper flakes
- a little less than a 1/4 teaspoon nutmeg
- 4 cloves garlic minced
- 1 cup bread crumbs
- 7 - 8 cups of quick and easy marinara sauce (recipe below)
- 1 pound spaghetti noodles

The Process
1. Preheat the oven to 400 degrees. Combine the sausage, beef, onion, eggs, parm, basil, oregano, pepper, salt, pepper flakes nutmeg, garlic and breadcrumbs in a large bowl and using your hands, mix well (this is my favorite part). Roll into golf ball sized portions and place on an greased, rimmed cookie sheet. Bake for 25 minutes - 30 minutes or until they start to turn brown and the grease has released from the meat ball.
2. While baking the meat balls, heat up the marinara sauce in a large pot over medium heat. When the meatballs are done place them in the sauce and simmer for 1 hour over low heat stirring occasionally.
3. When you have 30 minutes left start your water boiling. When the water is boiling add the noodles and cook until al dente. Strain out the water and return to the heat. Add a 2 ladle fulls of sauce and stir to combine evenly. Remove from heat.
4. To serve place a nest of noodles offset on a plate, then 2 - 3 meatballs, then a big ladle of sauce. Garnish with parsley and parmesan cheese if desired.
5. Enjoy!!!

** Quick and Easy Marinara **
Ingredients
- 1 onion minced
- 6 cloves garlic minced
- 1 teaspoon red pepper flakes
- 1 tablespoon olive oil
- 1/2 cup red wine
- 2 28 oz cans tomato sauce
- 1/2 cup parmesan cheese
- 1 tablespoon kosher salt
- 1 teaspoon pepper
- 1 teaspoon white sugar
- 2 teaspoons dried oregano
- 2 teaspoons dried basil

The Process
1. In a medium sauce pot, combine the oil, garlic, onion and red pepper flakes over medium high heat and cook for about 10 minutes. Then add the wine and cook for another 10 minutes or until the wine has bee reduced by half.
2. Add the tomato sauce, parmesan, salt, pepper, sugar, oregano and basil and stir well. Bring to a simmer and cook for 10 minutes over medium low heat stirring frequently.
3. Enjoy!

Kalbi Skirt Steak

Kalbi Skirt Steak

For those of you who haven't heard of Kalbi before it's the Korean's version of teriyaki and is sometimes referred to as galbi. Just like teriyaki, there are a million different ways to make your marinade. My old coworker used Sprite in her meat soak. No matter who's recipe you find and try out you will find the following 3 ingredients, soy, garlic and sugar. This is one that I have made up from several different methods and recipes that I am really happy with.

A note on soy sauce. Now for my entire life I was using Kikkoman soy sauce because that's pretty much anyone ever had at the stores. When I got with my wife and took her to my Asian store she almost kicked me in the face when she saw me grab a jug of Kikkoman. For those of you who don't know my beautiful wife is from Hawaiian and they only use Aloha soy. So I tried it out. It's super good I am not going to lie but I think that it's more for eating because it's sweeter. So now I use Aloha soy for eating and fried rice but I use Kikkoman for all my marinades and brines.

Anyways check this out and let me know what you think. You can use any kind of protein for this recipe like chicken or pork or even different cuts of steak. The traditional method is using short ribs which look like this but they can be hard to find and sometimes pretty expensive. The only thing I HIGHLY recommend is that this gets cooked on the grill. The char you get is amazing and shouldn't be missed. If you have any questions please shoot me an email.

Ingredients
- 8 cloves garlic, minced
- 1/2 cup brown sugar
- 1 cup soy sauce
- 1 teaspoon black pepper
- 1 pear, peeled, cored and pureed
- 1 tablespoon sesame oil
- 1/4 cup mirin
- 2 3 lb skirt steaks
- fried rice found here

The Process
1. Take the garlic and place in a bowl with the brown sugar. Using the bottom of a pint glass or a potato masher, smash these 2 ingredients together until you can really smell the garlic. Then add the soy, pepper, pear puree, sesame oil and mirin and whisk until the sugar has dissolved. Place your 2 steaks in a plastic bag with the marinade and place in the fridge for 2 - 3 days.
2. Remove from the fridge and set aside while you prepare your grill. If using a gas grill set it on high and start it then let it sit. If using charcoal prepare the coals for direct heat. When the grill is hot place the steaks directly over the heat and cook for 3 minutes. Flip and cook for an additional 3 - 4 minutes (this is for medium if you like it rarer take it off sooner if you like it more well done, leave it on longer) then remove from grill and place on a plate and cover with foil and let rest for 10 minutes.
3. Place steaks one at a time on the cutting board and using a very sharp carving knife, cut against the grain about 1/2 an inch thick. Serve with fried rice.
4. Enjoy!

Friday, October 22, 2010

Chicken Picatta

Chicken Picatta

Have you ever had chicken picatta? If you haven't you've been missing out. It's simply a combination of lemons, wine and capers. That's pretty much it. Not to mention that it can be made for 4 people in about 30 minutes or less. You will be amazed at hot quickly you can turn out this killer meal.

If you have never had capers don't fret, they are delicious. What is a caper you ask? It's an unripened flower bud that's brined kind of like a pickle. They give the dish that is heavy on wine and lemon flavors a-whole-nother level. This recipe is pretty straight forward but if you have any questions please feel free to shoot me an email.

Ingredients
- 4 boneless, skinless chicken breasts
- all purpose flour for dredging
- salt and pepper
- 6 tablespoons butter, divided
- 1 large lemon
- 1 cup white wine
- 2 cups chicken stock
- 1 tablespoon capers
- 1 pound noodles cooked according to package directions
- parmesan cheese

The Process
1. Take each chicken breast and fillet into 2 pieces along it's equator. Season each piece of chicken with salt and pepper then dredge with the flour. Shake off any excess then set on a plate until ready. Start your water boiling for the noodles.
2. Take 4 tablespoons of butter and melt in a large saute pan over medium high. Then add half the chicken pieces to the pan and cook until the down side is golden brown about 4 minutes. Flip and do the same. Remove from heat and set aside then repeat with the other half of the chicken pieces. When all chicken pieces are done return them all to the pan and add the wine. While wine is reducing, take the lemon and cut it on it's equator, the juice the lemon into the pan using your had to catch any seeds. Then just throw the rinds in (don't worry we aren't going to eat those).
3. Throw your noodles into the boiling water. When the wine and juice has reduced by 1/4, add your chicken stock and capers. Let simmer occasionally moving the chicken around to soak up all those juices. Season with salt and pepper. If it's too lemony add a little more chicken stock. When the noodles are done then so should this.
4. To plate add your cooked noodles to a place with 2 pieces of chicken. Ladle a spoonful or 2 of sauce over the noodles and chicken and sprinkle some Parmesan cheese over the top.
5. Enjoy!

Wednesday, October 20, 2010

Pictures from the Weekend

Kishelle

Now I have been spending a lot of time working on recipes for my cook book and taking pictures of my food. But I have found some time to go out and get some pics of random stuff as well as some pics of my friends. I just found out about the skin soften brush in Lightroom and it makes skin look amazing. Chicks dig that type of stuff anyway. Also had the opportunity to go to my buddy Jake's show at some hole in the wall brewery in Auburn which had awesome beer. Check out the pics and let me know what you think. Thanks for looking.

Direct Link

Chicken Alfredo

Chicken Alfredo

This is a dish that I have been working on for a while. I have tried a hundred different things and have had some pretty good results. Last night I remembered as I was on my way home from work, that my old boss used to put marscapone (fancy cream cheese) in his sauce. I thought to myself, self, that might take yours to the next level. So I went to the store on the way home and picked up half a pound of it and took it home to cook it all up.

Let me tell you that it was the best one I have ever made period. It tastes just like something you would get in a restaurant. I am serious, I had to take a step back to reflect on what was in my cast iron skillet. You need to try this I am being super cereal.

Now you can modify this in a hundred different ways. I have taken the chicken and seasoned it with cajun blackening seasoning and added sun dried tomatoes to make it a Cajun Alfredo. I have added roasted garlic to make it Roasted Garlic Alfredo. There are tons of ways to church this up. Even try using Marscapone it's really good.

If you have any questions please let me know.

Ingredients
- 4 chicken boneless, skinless chicken breasts
- 1/2 teaspoon garlic powder
- salt and pepper
- 1 tablespoon olive oil
- 4 cloves garlic, minced
- 1 shallot, minced
- 1/2 cup (1 cube) butter
- 2 cups half and half
- 8 ounces cream cheese
- 1 cup Parmesan cheese
- 1 pounds fettuccine noodles

The Process
1. Preheat your oven to 400 degrees. Take a cast iron skillet and heat the olive oil up over medium heat. Season the chicken breasts with salt, pepper and the garlic powder. When the oil is hot place the chicken breast in the skillet and cook until the side down turns golden brown about 4 minutes. Flip chickens over and cook for an additional 4 minutes then place in the oven to finish about 7 - 8 minutes. Start boiling the water.
2. Remove the pan from the oven and place the chicken breasts on a plate and cover in foil. Add the noodles to the water which is hopefully boiling by now. Add the butter to the pan that you just removed the chicken pieces from over medium heat. When the butter is melted add the garlic and shallots and saute for about 1 minute. Add the half and half and cream cheese and, using a whisk, mix until it's all melted. Then add the Parmesan cheese in small batches making sure that it's all mixed in and melted before you add any more. Do this until it's all melted then reduce the heat to low.
3. Strain your noodles and return your noodles to the pan with half of the sauce you just made over medium heat. Stir well to combine then turn off heat.
4. To plate add a good scoop of cheesy noodles to the center. Then slice the chicken and place on top of the noodles then cover with more Alfredo sauce. Garnish with parsley if desired.
5. Enjoy!!!

Tuesday, October 19, 2010

Hearty Shredded Beef Stew

Beef Stew

Who doesn't like beef stew? It's one of those go to soups that you make when the weather gets cold and it warms you to your core. I love all the veggies and the meat when it falls apart in your mouth, mmmmmmmm. I can't wait for lunch now.

Now there are a hundred ways to make this but you know me I love to use my crock pot. If you don't want to use this method then you can cube up the beef and saute it off then go from there. I just like it when the beef is all stringy and you get it in every bite. Also the red wine is optional but I HIGHLY recommend it. It takes the soup to a whole new level.

You know what else I didn't realize until right now I didn't put mushrooms in this. Whoops. Add 1/2 a pound of button mushrooms, that ate quartered, to the veggie mix.

Please let me know if you have any questions.

Ingredients
- 4 - 5 pound beef roast
- 1 1/2 cups red wine, divided
- salt and pepper
- 1 teaspoon garlic powder
- 1 teaspoon olive oil
- 4 cloves garlic, minced
- 1 large onion, diced
- 6 carrots, peeled and diced
- 5 stalks celery, diced
- 6 medium potatoes, diced
- 3 bay leaves
- 8 cups good beef stock or broth
- 1 teaspoon Tabasco sauce
- cornstarch and water combined to make a slurry

The Process
1. Take the roast and seasons with salt, pepper and then the garlic powder and place in a crock pot. Cover with 1 cup of the red wine, set the crock pot to low and let cook for 8 - 10 hours. Best to do this in the morning before you go to work.
2. Remove the roast form the crock pot and reserve all that liquid at the bottom. Shred the beef and set aside until ready to use. In a large stock pot over medium heat the olive oil then add the garlic, onions, carrots, celery and potatoes and stir well for about 10 minutes or until the onions are translucent.
3. Add the shredded beef, bay leaves, beef stock and Tabasco to the pot and stir well. Season with salt and pepper then let simmer for about 30 minutes or until all the veggies are soft. Then add your slurry until you have the consistency you desire and cook an additional 5 minutes.
4. Serve with crusty bread and some fresh ground black pepper.
5. Enjoy!

Monday, October 18, 2010

Christian's BBQ Dry Rub

Christian's BBQ Rub

This is a rehash of an older post but I have made some changes to my rub so here it is. I uses this on all things I smoke on the bbq in one form or another. It's also good to just season anything with and throw on the grill. This stuff is good on fries as well like a seasoning.

The best places I have found to buy large quantities of spices is Cash and Carry and Costco. They usually have the bigger portions of these spices ready to go. Also turbinado sugar is Sugar in the Raw but you can use brown or white if you like. If you have any questions please let me know.

Ingredients
- 1 Cup Kosher Salt
- 1/2 Cup Pepper (preferably course ground)
- 1/2 Cup Granulated Garlic
- 1 Cup Brown Sugar or Turbinado Sugar (sugar in the raw)
- 1/4 Cup Paprika
- 1/4 Cup Onion Powder
- 1/4 Cup Chili Powder
- 1/4 Cup Cumin
- 2 tablespoosn Ground Mustard (the Asian stuff is the best)
- 2 tablespoons- Oregano
- 2 tablespoons- Celery Seed
- 2 tablespoons- Ground Ginger
- 1 - 3 tablespoons Cayenne Pepper (depending on how hot you like it)
- 2 tablespoon Ground Coriander
- 1 tablespoon Ground Tumeric

The Process
1. Combine all ingredients in a bowl and mix well. Store in old spice containers for up to 6 months.
2. Enjoy!

Smoked Baby Back Ribs with Root Beer Beans and Succotash

BBQ Ribs with Root Beer Beans and Succotash

So many of you have been to my place and had my ribs. Let me tell you they are an ever evolving mix of recipes and techniques. I see something new that I could add, possibly a new way of cooking them or maintaining the meat of the heat and I have to try it. That being said this is my base recipe for my ribs. Trust me they will turn out really well.

So I use baby backs in this recipe but you can use the St. Louis style ribs spare ribs they all turn out really well. I use a lot of brown sugar as well because I like sweet ribs. If you don't then don't use them. I have a recipe for my rub right here but if you don't want to make your own then buy your favorite one from your local grocery store. Also you can used canned beans if you don't want to soak and cook beans. That is why I love my pressure cooker.

Now a note on the cooking technique you really need to use a charcoal grill and you need to use indirect heat. Charcoal because you need to be able keep the temp low and indirect heat because if you put the ribs right on the heat they will burn. Indirect heat means all the charcoal all on one side of the grill with all the meat on the other side. For a better direction check here.

Any questions please feel free to shoot me an email because I love talking barbeque.

** Ribs **
Ingredients
- 2 racks of baby back ribs
- 1/2 cup bbq rub
- 1 cup of brown sugar, divided
- wood chips, I use apple, soaked in water for at least 1 hour before use
- 1 cup apple cider in a spray bottle
- 1/4 cup honey
- BBQ sauce if desired
- Root Beer Beans (recipe follows)
- Succotash (recipe follows)

The Process
1. Get one shoot of charcoal going on your barbeque. While this is going on, take the ribs and cover both sides of the ribs with the rub and 1/2 cup brown sugar. Take your charcoal after they are all heated and put on one side of the grill. Add the ribs to the non charcoaled side of the grill. Now keep your temperature around 250 degrees and occasionally add wood chips to keep it smoking. About every time you add wood chips give your ribs a good spritz of apple cider.
2. About 3 hours into the process, add the remaining brown sugar and honey to each rack of ribs. and smother evenly on the top side of the ribs. When the ribs are done, which takes about 3 - 4 hours, you can tell because the bones start to stick out of the meat by about one inch.
3. Cover in foil for about 20 minutes then stand the ribs straight up and cut straight down along the bone with a really sharp knife.
4. Serve with bbq sauce if desired.
5. Enjoy!

** Baked Beans **
Ingredients

- 1 pound dried pinto beans cooked according to package, or 3 cans beans drained and rinsed
- 1 pound bacon, sliced thin
- 1 onion
- 1 can or bottle root beer, I used Weinhards
- 1/2 cup ketchup
- 1/4 cup molasses
- 1/4 cup brown sugar
- corn starch and water combined to make a slurry
- salt and pepper

The Process
1. Cook the beans according to the package. When they're done, add the bacon and onion to a dutch oven or a medium sized pot over medium heat. Cook for about 10 minutes or until the bacon is almost done.
2. Add the root beer, ketchup, molasses and brown sugar to the pot and bring to a simmer. Season with salt and pepper and let simmer for about 20 minutes stirring occasionally. Add the beans and bring back to a simmer. Then stir in the slurry until you get the consistency you want. Simmer for about 5 more minutes. Remove from heat.
3. Enjoy!

** Succotash **
Ingredients

- 1 teaspoon olive oil
- 1 clove garlic, minced
- 1 red pepper, stem and seeds removed, diced
- 1/2 red onion, diced
- 1/2 teaspoon red pepper flakes
- 1 cup corn
- 1 can black beans, drained and rinsed
- 1/4 cup of your favorite bbq sauce
- salt and pepper

The Process
1. Heat the olive oil over medium heat in a large saute pan. Add the garlic, red pepper, red onion and red pepper flakes and mix well. Cook for about 5 minutes or until all the onions are translucent.
2. Add the corn and beans to the pan and mix well and cook for another 5 minutes. Add the bbq sauce, mix well and remove from heat.
3. Enjoy!

Kalua Pig and Cabbage

Kalua Pig and Cabbage
So if you haven't had much Hawaiian food you are missing out. Now I am still pretty new to this stuff but there's a few dishes that I have become quit the fan of. If these dishes had a Facebook page I would "like" them. One of these dishes is Kalua pig and cabbage. There is tons of meat and cabbage and you serve it over rice. Bomb.com. If you have some Sriracha then this is the dish that needs it.

Now there are several different cooking methods you can use. The traditional way is to bury the pig and some day I will do this. I just use the crock pot for now and it always turns out great. If you can't find Hawaiian sea salt then just kosher salt or regular sea salt will suffice. Also be very careful with the liquid smoke because that stuff is very potent. Add about half of what I call for then see if it's smokey enough for you. If not add the rest.

Hope you like it and make sure to let me know if you have any questions.

Ingredients
- 4 - 5 pounds pork shoulder
- 1 tablespoon Hawaiian salt
- 1/2 cup soy
- 1/4 cup worstershire
- 1 - 2 teaspoons liquid smoke
- 8 cloves garlic, sliced
- 1 inch of ginger sliced
- 1 head cabbage, roughly chopped

The Process
1. Take the pork and place in a crock pot then season all over with the salt. Then combine all the other ingredients except the cabbage in a bowl and mix well then pour over the pork. Let cook in the crock pot for 8 - 10 hours.
2. When pork is done, remove the pork making sure there isn't any ginger or garlic sticking to it. Then take the sauce and juice and run through a strainer into a small sauce pan. Take the sauce and reduce by 1/4 over medium heat.
3. Add the pork to a large wok, making sure to shred it while stirring it. Then add the cabbage and reduced sauce and stir well. Cover with a cookie sheet and cook until all the cabbage is cooked down. Keep removing the lid and stirring, then putting the lid back on.
4. When all the cabbage is cooked and sweating, serve over white rice.
5. Enjoy!!!

Saturday, October 16, 2010

Chinese Chicken Salad

Chinese Chicken Salad

I am not going to lie but I am not really one for salad as a main course. It will probably be the last thing I order next to the olive plate. However this salad is the best American-Asian fusion dishes ever invented. The dressing is so full of flavor, the cabbage gives off a killer crunch and the chicken ties it all together.

There are a hundred different things you can do with this salad. You can use beef instead of chicken, you can use lettuce instead of cabbage, you can add red peppers to the salad mix. You can add and remove what you like and don't like. Experiment and make this your own. The dressing is good the way it is but my wife doesn't like the chunks of ginger and garlic so I strain it. If you have any questions please let me know.

Also I don't really care about plating too much but this one I got a little carried away. It looks good though right?

Ingredients
- 4 boneless, skinless chicken breast
- 2 cups teriyaki sauce found here or your favorite store bought one
- 6 cloves garlic, minced
- 2 inches ginger, peeled and minced
- 1/4 cup brown sugar
- 1/2 cup soy, Aloha preferred
- 2/3 cup rice vinegar
- 1 tablespoon sesame oil
- 1 table chili, garlic sauce
- 1/4 cup vegetable/canola oil
- 6 carrots, peeled and shredded
- 1/2 head purple cabbage, shredded
- 2 heads napa cabbage, shredded
- 2 bunches green onions, sliced thin on the bias
- 1 can mandarin oranges, drained
- 1 can water chestnuts, drained
- 1/2 cup sliced almonds

The Process
1. Take the chicken and combine with the teriyaki sauce and place in a plastic bag and marinate for 1 - 2 days.
2. Take the ginger, garlic and the brown sugar and place in a medium sized mixing bowl. Take a pint glass or a potato masher and mash them all together. This gets the juices running and moving around from the garlic and ginger. Add the soy sauce, rice vinegar, sesame oil, chili sauce, oil and mix well. Place in the fridge until it's ready to be served mixing occasionally.
3. In a large bowl combine the cabbages, carrots green onions and mix well. Place in 4 separate large bowls.
4. Cook the chicken however you want I used the grill but you can use the oven or a George Foreman. Set aside for 5 minutes then slice into strips.
5. Take the oranges and water chestnuts and split between the 4 bowls. Add the chicken to each bowls. Add dressing and garnish with sesame seeds (optional).
6. Enjoy!!!

Thursday, October 14, 2010

Chicken Cacciatore

Chicken Cacciatore

Chicken Cacciatore is a dish I have had a hundred different ways from a hundred different people. You can combine a couple of hey ingredients and within an hour you have one of the most delicious dishes you'll ever have. My Mom used to make it with a whole cut up chicken and put it in an electric fry pan with tomatoes all day and it was awesome. I recreated it a couple of times with great success but it always seemed like it could be better. So it was one of those recipes that sat on the back burner for a long time and didn't get made much.

Then I started to watch the Food Network religiously and they did a special on Chicken Cacciatore. They added a ton of wine and peppers and mushrooms and all of a sudden my interest was sparked again. So I modified my recipe to take into account some of the things I saw in the show and now it's one of my go to recipes. I make this for people when I really want to impress them.

You can use whatever kind of chicken you want just as long as it has bones in it. Also make sure that it has small enough pieces that you can fry each side with ease. For this recipe I use chicken thighs because they are easy to work with and have tons of meat on them. Also I like the flavor from dark meat better than white. If you want white meat make sure to use chicken breast halfs that have the bones in them. I remove the skins in my recipe because I have found that they get kind of flimsy and not so appetizing but it's up to you. Use whatever kind of white wine you like or have on hand it's all good. This can be served with just about anything but I like to serve mine with white rice. I hope you like it and make sure to let me know what you think.

Ingredients
- 10 to 12 chicken thighs skins removed
- salt and fresh ground black pepper
- 1 teaspoon garlic powder
- flour for dredging
- 3 tablespoons olive oil for frying
- 1 onion sliced into half moons
- 1 red pepper, seeds and stemmed removed, sliced
- 1 green pepper, seeds and stemmed removed, sliced
- 1 yellow pepper, seeds and stemmed removed, sliced
- 5 gloves garlic, minced
- 1 pound button mushrooms, sliced
- 1 teaspoon red pepper flakes
- 1 cup white wine
- 2 cups good chicken stock
- 1 28 oz can diced tomatos
- 1/4 cup tomato paste
- 1 tablespoon dried oregano
- 1 tablespoon dried basil

The Process
1. Take the chicken thighs and season with salt, pepper then sprinkle with the garlic powder. Heat the oil in a heavy bottomed large pot over medium heat. Dredge with flour and set on a plate until the oil is ready. In batches, fry the chicken until the side down is godlen brown about 6 minutes, then flip and do the same thing until the other side is done. Remove from heat and set aside.
2. After all the chicken has been browned add the garlic, peppers and pepper flakes and saute until the onions become translucent and start to release their juices about 10 minutes. Add the mushroom and cook until they start to release their juices about another 6 minutes.
3. Add the wine and let reduce by half. Then add the chicken stock, tomatoes, tomato paste oregano and basil and stir well. Season with salt and pepper until it tastes oh so right. Return the chicken to the pot making sure that it's covered by the sauce. Bring the sauce to a boil then turn the heat to low and simmer for an hour.
4. To plate take a scoop of rice and put on a plate. Take 2 - 3 pieces of chicken and set on plate then cover with a couple scoops of the sauce. Sprinkle with some parmesan and serve.
5. Enjoy!

Wednesday, October 13, 2010

Turkey Tacos with Pico de Gallo and Guacamole

Turkey Tacos

Who doesn't love taco night? I mean you can put whatever you want in these taco shells and it always ends up good. Pretty quickly they get so packed you have to roll them up like burritos but that's no biggie. I have even recreated the double decker taco which is a soft shell with refried beans laid on the outside of a hard shell. There are a million variations of this. This is what I would consider my base recipe for the meat which can be altered but will get you away from that seasoning they sell in a packet. Also I have added recipes for my quac and salsa which take these to the next level.

Now I went on this turkey kick for a while and one of the things I stuck with was using ground turkey as the meat but you can use ground beef or chicken if you want. Just make sure that it's not ground turkey breast because that stuff comes out super dry. Also feel free to experiment with the peppers you put in the salsa depending on how much heat you like. You can leave the seeds in for more burn if you want. I kind of let the veggies speak for themselves here. One more thing you don't have to fry the shells it just gives you some nice flavor and makes them look really cool. Hope you enjoy them.

** Tacos **
Ingredients
- 1 tablespoon vegetable oil
- 2 pounds ground turkey (not ground turkey breast)
- 1 1/2 cups chicken stock
- 3 tablespoons tomato paste
- 1 tablespoon chili powder
- 1 teaspoon cumin
- 1/2 teaspoon red pepper flakes
- 1/2 teaspoon Mexican oregano
- salt and pepper
- sliced lettuce
- shredded cheddar cheese
- 8 inch taco flour tortillas
- oil for frying (optional)
- pico de gallo (recipe follows)
- guacamole (recipe follows)

The Process
1. If making your own guacamole and salsa, do those 2 things first and place in fridge while you do the following steps. They are located below.
2. In a large skillet add the oil and turkey over medium heat using a spatula to break up the turkey the best you can. When all the meat is done cooking, about 10 minutes, drain out the fat using a collinder. Return the turkey to the pan over medium heat and add the chicken stock, tomato paste, chili powder, cumin, pepper flakes and oregano then season with salt and pepper. Bring to a simmer then reduce to low and continue cooking until all the juices have soaked into the meat stirring occasionally.
3. While the meat is simmering bring 1/4 inch of oil to medium temperature in a large fry pan. Place one tortilla at a time in the oil popping the pockets as they appear in the tortillas. When the side down is golden brown in places, flip and do the same thing. When the other side is done, remove from pan and dab both sides with a paper towel then place on a plate covered with a towel to keep warm or a tortilla warmer if you have one.
4. When meat is done you are ready to assemble your tacos. Take a shell and place in the hot taco meat, then cheese, then lettuce the complete with the pico de gallo. Serve with black beans and spanish rice found here and garnish with the guacamole.
5. Enjoy.

** Pico de Gallo **
Ingredients
- 6 tomatoes, stem, core and seeds removed, then diced
- 2 jalapenos, stem and seeds removed, minced
- 1/2 small red onion, minced
- 1 lime juiced
- 1 clove garlic, minced
- 2 tablespoons cilantro, roughly chopped
- 1 teaspoon olive oil
- 1 tablespoon rice vinegar
- salt and pepper

The Process
1. Combine tomatoes, jalapenos, onion, lime juice, garlic, cilantro, olive oil and vinegar in a bowl stir well to combine. Season with salt and pepper and place in the fridge until ready to use stirring occasionally.
2. Enjoy!

** Guacamole **
Ingredients
- 2 avacados
- 2 tomatos, stem, core and seeds removed then diced
- 1 lime juiced
- 1/2 teaspoon cumin
- 1/4 teaspoon cayenne powder
- salt and pepper

The Process
1. Take the avocados, remove the skins and pits and place in a bowl making sure to save one pit. Take a potato masher and mash up the avocados until you have the consistency you desire. Then add the lime juice, cumin and cayenne and stir well. Season with salt and pepper and stir well. Add the reserved pit (this will keep it from turning brown) and place covered in the fridge until needed stirring occasionally.
2. Enjoy!

Tuesday, October 12, 2010

October 11, 2010

Kishelle

So we have been busy as always but I have been taking tons of pictures. I have shot 1500 shots in a month but it's a serious learning process. I haven't been sitting around focusing on my pictures like I want to but I have been learning about stills and staged pictures. I also have been learning a ton about how to use my flash. This weekend I get to take pictures of my buddy who's in a band which will be all flash all night. Anyways check these out and let me know what you think.

Direct Link

Bolognese Sauce with Spaghetti

Bolognese Sauce with Spagetti

Probably the first question that comes to your head is "What the heck is bolognese sause?" What it is essentially is a meat sauce which most people refer to as spaghetti sauce which doesn't make a whole lot of sense because spaghetti is a form of noodle. I mean nobody says they are making penne sauce for dinner. However I have been calling it spaghetti sauce for years and it's hard calling it anything else. I guess I am just letting you know.

This is one of those recipes I have been working on for years. My Mom showed me how to make it way back in the day and it was one of the only recipes that I actually remembered. I used to combine all the ingredients in a crock pot all day and call it good. It has evolved into this recipe that I am very happy with. The meat gets mashed to it comes out very smooth and silky and the roasted vegetables and red wine give it a deep, robust flavor.

Now you can serve this with just about any noodle on the planet I used spaghetti. You can save the left over sauce and make a zitti which is a baked noodle dish. Recipe to come later. Also experiment with the red wine I used what Alton Brown recommends which is a blended red wine. You can also use Italian sausage instead of ground pork if you want plus you can use leaner ground beef than what I used.

As always let me know what you think and if you have any questions please feel free to contact me.

Ingredients
- 10 stalks celery, roughly chopped
- 12 carrots, roughly chopped
- 2 onions, roughly chopped
- 10 cloves garlic, paper removed
- 3 tablespoons olive oil, divided
- 1 teaspoon red pepper flakes
- 1 pound ground pork
- 1 pound ground beef 77/23
- 2 cups red wine, divided
- 1 28 ounce can diced tomatoes
- 1 28 ounce can tomato sauce
- 1 pound button mushrooms, sliced
- 1 tablespoon dried oregano
- 1 tablespoon dried basil
- 1 teaspoon garlic powder
- 1/2 cup fresh parmesan reggiano cheese plus more for garnish
- 1 teaspoon sugar
- 1 teaspoon fresh ground black pepper
- 3 - 4 teaspoons kosher salt
- noodles for serving

The Process
1. Preheat the oven to 400 degrees. Combine the carrots, celery, onions and garlic cloves in a roasting pan and toss with 2 tablespoons olive oil and season with salt and pepper. Roast in oven for about 45 minutes or until carrots are soft, stirring about every 5 - 10 minutes. Take out of the oven and let cool for 20 minutes. In a food processor or blender, place half of the veggies and 1/4 cup of the red wine and puree until smooth. Repeat for the other half and place in a bowl until needed.
2. In a large pot over medium temperature, heat the remaining table spoon of olive oil. Add pepper flakes, beef, pork and vegetable puree to the pot. Using a potato masher, mash all the meat and vegetables together until mixed well. Continue this method until you start to see the fat from the meat render out. When this happens add the remaining 1.5 cups of red wine and bring to a simmer. Reduce heat and continue to simmer for about 10 minutes stirring now with a regular spoon.
3. Add the 2 cans of tomatoes, mushrooms, oregani, basil, garlic powder, parmesan cheese, sugar and pepper then stir well to combine. Then add 3 tablespoons of salt and test to see if it's necessary to add the last one. Stir well and bring to a simmer over medium heat. Reduce heat to low, cover and simmer for an additional 45 minutes to an hour.
4. During the last 15 minutes add noodles to salted, oiled water and cook until al dente. When the noodles begin to boil turn off your sauce. After you have drained the noodles return them to the heat with one ladle full of sauce and stir to combine. The evenly coated, turn off the stove and get ready to plate.
5. In the middle of a plate or bowl - plate, add the noodles then cover with 1 - 2 ladles of sauce. Sprinkle some parmesan reggiano on top and serve with some garlic bread.
6. Enjoy!

Chinese BBQ Pork Tenderloin

Chinese BBQ Pork with Fried Rice

One of my all time favorite appetizers to order when I am in a Chinese restaurant is BBQ pork. The sweetness and the complexity of the flavors makes this my go to app. When you want to make it a meal all you need to do is pair it with some fried rice and you're good to go.

Now as you look through the list below might look foreign to you and that is okay. Now if you are like me and just simply love to cook the small little section of Asian ingredients in my Safeway wasn't going to cut it, I needed a whole store dedicated to this type of cuisine. It sure helped that I had a Korean roommate at the time and introduced me to my now favorite store.

When you first walk into a place like that it might smell a little weird and be overwhelming and that's okay, you will get used to it. This is the only place to come for things like rice and all those exotic spices and sauces. If you are like me you eat a ton of Sriracha and these types of places will have that stuff for 2 bucks a bottle for the big ones unline the grocery stores which have then for 5 bucks for the little guy. Also these stores are great for cooking and serving wear. I got this teflon coated wok I have had for 5 years for 20 bucks and I love it.

Now when you start going to these places regularly you should really start getting to know the staff and asking them questions. Get into a conversation about what you would like to make or an ingredient that intrigues you with the staff. They are an abundance of information that trumps anything you can read on the internet.

If not then all of these special strange ingredients can be found in that Asian section of your local grocery store. Also the red food coloring is optional because all it really does it make it red. Also Costo if a great place for pork tenderloins you can get 4 for about 15 bucks. Also make sure to have a meat thermometer handy because if you over cook pork it gets super tough. Please let me know if you have any questions or suggestions.

Ingredients
- 1/4 cup hoison sauce
- 1/2 cup mirin
- 1/2 cup soy sauce
- 1/4 cup white sugar
- 2 cloves garlic minced
- 1 teaspoon 5 spice powder
- 1/4 teaspoon red food coloring
- 2 pork tenderloins
- Fried rice (recipe follows)

The Process
1. Combine the hoison, mirin, soy, sugar, garlic, 5 spice and food coloring in a nowl and whisk until the sugar has disolved then place in resealable plastic bag. Add the tenderloins to the bag, seal and place in the refrigerator for 2 - 3 days. Trust me it's worth the time.
2. Preheat the oven to 350. Remove the tenderloins from the bag and get as much of the marinade off as possible then place side by side, but not touching, on a foil covered baking sheet. Bake for 30 - 40 minutes or until an meat thermometer reads 140 degrees. Let rest for 5 minutes before you cut into them.
3. Slice against the grain, serve with ketchup and chinese mustard. If serving for a meal include a nice scoop of fried rice.
4. Enjoy!

Fried Rice
Ingredients
- 2 cups of rice cooked in a rice cooker
- 3 tablespoons vegetable or canola oil
- 1/4 cup soy sauce
- 4 green onions diced
- 1 cup frozen peas and carrots
- 1 tablespoon oyster sauce
- 2 eggs
- 1 teaspoon sesame oil

The Process
1. In a wok add the oil over medium high heat until it's hot and ready to go. Add the rice and stir until the rice is coated. Continue to stir for an additional minute then gradually stir in the soy sauce. Continue stirring until the rice is evenly coated.
2. Add the onions, peas and carrots and oyster sauce to the wok stirring constantly. In the middle of your wok make a clear spot and add the 2 eggs. Whip them up with your wooden spoon until they are scrambled. When the eggs are done mix in with the rest of your rice. When the eggs are all stirred in add the sesame oil. Remove from heat.
3. Enjoy!

Friday, October 8, 2010

Balsamic Chicken with Pasta Pesto

Balsamic Chicken with Pasta Pesto

Balsamic vinegar is one of those ingredients that has about a million and one uses. One of my favorite all time things to do with it is to make salad dressing with it but it can be used as a marinade as well. If you use vinegar in a marinade though, you need to make sure not to keep it in it too long because things like lemon and lime juice and vinegars cook raw meats as they sit. Also you can grill this chicken instead of pan searing it no matter how you cook this it will turn out great. You can find balsamic vinegar next to the salad dressing in your favorite grocery store. Also you can use whatever noodles you want I just chose to use penne because it's locks in a ton of the pesto. Let me know what you think.

Ingredients
- 1 clove garlic minced
- 1 teaspoon fresh rosemary, minced
- 1/4 cup balsamic vinegar
- 1 teaspoon salt
- 1/2 teaspoon black pepper
- 1 teaspoon lemon juice
- 2 tablespoons olive oil, divided
- 4 chicken breasts
- 1 cup pesto sauce (recipe here)
- 1 pound penne
- fresh parmesean cheese, grated

The Process
1. Combine the garlic, rosemary, vinegar, salt, pepper, lemon juice and 1 tablespoon of olive oil in a bowl and mix well using a wire whisk. Place in a flat casserole dish with the chicken turning to coat and place in the refrigerator for 15 minutes. Take the chicken out and flip it over then return to the fridge for an additional 15 minutes. Place on the counter until ready to use.
2. Preheat the oven to 400 degrees. Take a large pot and fill with water, olive oil and salt for the noodle and bring to a boil. Heat a cast iron skillet with the remaining tablespoon of olive oil over medium heat. When the water boils add the noodles and stir occasionally so they don't stick and continue to boil until they are al dente about 10 minutes. While the noodles are boiling add the chicken to the hot skillet and cook each side of the chicken about 3 minutes per side. You should get a nice dark color on each side. Place the skillet in the oven to finish cooking the chicken about 5 minutes.
3. When the pasta is done drain the water and return the pan and noodles to the heat. Add the pesto sauce and stir to combine. When all noodles are coated, turn heat off. Your chicken should be done by now and sitting on the stove to cool.
4. Place noodles and chicken on a plate, garnish with the parmesean and fresh ground black peppter.
5. Enjoy!

Homemade Pesto with Pecans

Pesto Sauce

Pesto was one of those illusive sauces that I thought you could only buy and whoever was making it was some sort of wizard that could conjure up this magical green goop. Then I started to watch cooking shows and found out that there really isn't anything to it. You throw some stuff into a food processir and bam, you have homemade pesto. So I started making my own. The days of buying this beautiful green sauce were behind me.

After I got the base recipe down I started experimenting with different ingredients. The first thing I fooled around with was the nuts that you place in it. The original recipe calls for pine nuts which are crazy expensive and somewhat bland. So I tried walnuts, hazlenuts, peanuts and chestnuts but the best results I had were with pecans. They are bursting with flavor and bring out more of the basil flavor. I also started adding different things to the purree including sun dried tomatoes which is amazing. I left it out of this recipe though. Also traditionally for some acidity most people add lemon juice which I think makes it a little bitter so I use red wine vinegar.

So this is my base recipe for pesto. You can play around with whatever you like to make it your own. You can put this stuff on pasta, pizza, use it as a marinade or even stuff it inside mushrooms. It's one of the most universal and recognizable sauces around. If you are having trouble finding basil at your local grocery store (Safeway, Albertsons, Top Food) check your local produce stands or specialty grocery stores. If you have any questions or suggestions let me know.

Ingredients
- 1 cup whole pecans
- 1 bulb garlic, all paper removed
- 2 cups basil leaves
- 1 cup parmesean
- 1/4 cup red wine vinegar
- 1 teaspoon pepper
- 1 - 2 teaspoons salt
- 1 cup olive oil

The Process
1. Take all the ingredients minus the olive oil and add to a blender or food processor. Place the oil in something that is easily pourable. Start the food processor and slowly add oil. As you add more oil it will start to blend more. After you add all the oil if it's still not smooth enough for you add a little more oil. Continue to purree for an additional minute after all the oil has been added.
2. Remove from the food processor and use it on whatever you want. Store additional sauce in the fridge for 2 weeks or in the freezer for 2 months.
3. Enjoy!

Wednesday, October 6, 2010

Pork Verde Enchiladas

Pork Verde Enchiladas

For a long time I was accustomed to buying canned enchilada sauce, particularly the green/verde one when it came time to make making enchiladas. Then I watched some TV and did a little online research and found out how easy it is to make from scratch. The hardest part of this meal is prepping the veggies for the food processor. It tastes so good and authentic you will be amazed at how amazing it resembles the canned or even the restaurant version. As opposed to red enchilada sauce that is usually a tomato based sauce, verde's base consists of tomatillos and green peppers usually anaheims and poblanos. Don't worry they sell all these at your local super market.

There are a couple of notes to take into account. Tomatillos are the green tomatoes that have the husks on them. If there's a local produce stand close to your place then that's where you should get them. If not then your favorite grocery store will have them. Same with the anaheim chilies. Also in my recipe I use 4 habaneros but you can use less, use a different pepper like a japapeno or a serrano or just skip it if you don't want the heat. Let's be honest though you are eating Mexican food it should have a kick to it. Also masa flour is corn flour that can be found in the Spanish section of your grocery store. One more thing my cooking method calls for a crock pot but if you don't have one you can use a stock pot and simmer for 3 - 4 hours.

Ingredients
- 3 cups good chicken stock
- 2 pounds anaheim chilis, seed and stem removed
- 2 pounds tomatillos, husks removed then quartered
- 4 habanero peppers
- 1 teaspoon cumin
- 1 teaspoon oregano
- 1 teaspoon garlic powder
- 1 tablespoon kosher salt
- 3 bay leaves
- 2 - 3 pounds pork loin cut into one inch cubes
- 8 inch flour tortillas
- shredded Mexican blend cheese
- 1 avacado skin and pit removed, sliced
- Sour bream
- Spanish Rice, recipe follows
- Black Beans, recipe follows

The Process
1. Divide the the peppers, tomatillos, habaneros and chicken stock into 4 batches and place into a food processor or blender and puree until smooth. The chicken broth is used to get the juices moving and make the blending easier. Place in a crock pot along with the cumin, oregano, garlic powder, salt, bay leaves and pork. Set the crock pot to low and simmer for 10 - 12 hours. Best to do over night or while you are at work all day.
2. Place your oven on broil. To assemble your enchiladas, take a slotted spoon and scoop out enough meat to fill one tortilla, then roll up and set on a plate. Then using regular spoon scoop out some sauce and place on top the enchilada. Do this until you have enough for your portion. Then cover with cheese and place in the oven until it melts.
3. Using a hot pad, take out of the over and set aside to cool. Serve with spanish rich and beans and garnish with avocado and sour cream.
4. Enjoy.

** Black Beans **
Ingredients
- 2 cans black beans
- 1 teaspoon cumin
- 1 teaspoon chili powder
- 1 teaspoon salt
- 1 bay leaf

The Process
1. Bring all ingredient to simmer and continue to do so for 30 minutes stirring occasionally. Make sure not to drain the beans you want that juice.
2. Enjoy!

** Spanish Rice **
Ingredients
- 2 cups cooked white rice
- 3 tablespoons canola or vegetable oil
- 1/2 onion, diced
- 1/2 green pepper, diced
- 1/2 red pepper, diced
- 1 japaleno seeds removed, minced
- 3 tablespoons tomato sauce
- 2 tomatoes, chopped
- 1/4 teaspoon paprika
- 1/4 teaspoon chili powder
- 1/4 teaspoon cardamon
- 1 cloves garlic, minced
- Salt and pepper


The Process
1. In a medium pot over medium heat the oil. Then add the peppers, onions and jalapeno and cook until fragrant about 2 minutes. Add the rice and stir until the rice is coated evenly in the oil.
2. In small batches stir in the tomato sauce and tomatoes, cooking off some of the liquid each time. When all of it is in, stir in the paprika, chili powder, cardamon and and garlic. Season with salt and pepper and continue cooking and stirring until veggies are done.
3. Enjoy.

New Flash

Mom in law

So I bit the bullet and bought a flash. For Canon camera's it's kind of an all or nothing thing. This flash is totally sweet though and I will be able to do a number of cool things with it. I have been kind of a slave to shadows until now but not anymore, they are mine to make disappear from here on out. So take a look at my pictures and let me know what you think. I am pretty sure I am like one lens away from being comfortable taking pics for people at an amateur level. Thanks for looking.

Direct Link

Tuesday, October 5, 2010

Baked Potato Soup

Baked Potato Soup

As the weather gets colder here in Washington state the comfort food recipes start to emerge from my repertoire. This recipe in general just screams warm fall food that sticks to your ribs and makes you feel good all over. Not to mention it has tons of smoky bacon in it which is the magic meat. If you have never made this before you will be amazed at how much this tastes like a baked potato. It's just your basic milk base broth but when you get the hang of it you can use it to make any chowder you can imagine.

My recipe used gold or yellow potatoes but you can use whichever kind you have. I like the gold ones better because they keep their shape better then say a russet potato. But feel free to use whatever you have. Also the cheese I use is medium cheddar but you can use If you have any questions please let me know.

Ingredients
- 2 pounds thick sliced bacon diced small
- 10 - 12 yellow/gold potatos, peeled and diced into 1 inch cubes
- 1/2 cup butter
- 1/2 cup all purpose flour
- 1 bunch green onions diced
- 1 cup sour cream
- 8 cups 2%/whole milk
- 3 cups shredded medium cheddar cheese

The Process
1. Take the bacon and in a large skillet and cook until all the pieces are done and crispy. Strain the bacon from the grease and set aside. While the bacon is cooking prepare your potatoes and place in water so they don't turn brown.
2. In a large stock pot over medium heat, add the butter and bring to a simmer. Add the flour a little at a time stirring constantly until all the flour is mixed well with the butter creating a roux. Cook the roux for an additional 2 minutes stirring occasionally. Add the milk and bring to a boil.
3. The the milk and butter roux is simmering, add the cheese and sour cream. When the cheese is melted and the sour cream dissolved add the reserved bacon and green onions and bring to a simmer.
4. Cover and simmer for 20 - 30 minutes or until the potatoes are done. Serve in bowls with a green onion garnish or a dollop of sour cream.
5. Enjoy!!!

Jambalaya

Jambalaya

Jambalaya is one of those dishes that is in this secret society of Cajun dishes that people assume is crazy hard to make. In all actuality they aren't really that tough. Not to mention that this Jambalaya recipe is so good you will be addicted to it in no time. Cajun food is something near and dear to my heart, it usually has smoked sausage in it, it always has onions and peppers in it and it's always spicy which I love. You can serve it over rice or noodle but no matter how you do it, you'll be loving it. Also I use chicken in my recipe but you can use shrimp if you like. If you use this method add the uncooked shrimp during the last 10 minutes or simmering or they will turn out tough.

There are a few interesting ingredients in this recipe. The first is andouille sausage and this you can find at your local butchers or a specialty grocery store. It's very key to this dish because it adds a ton of smokiness to the meal. If you can't find the fresh kind the horseshoe shaped one called smoked sausage that's shaped like a horseshoe will work just fine. The second is file (fee-lay) powder and this you can find at a grocery store. I have found it in a few different sections of my local Safeway but they do have it. Ask them if you can't find it. Trust me it's there.

Let me know what you think and if you have any questions shoot me an email.

Ingredients
- 1 pound andouille sausage cut into half inch sections
- 1 pound boneless, skinless chicken thighs cut into 1/2 inch cubes
- 1 - 2 tablespoons peanut oil
- 1 large onion diced
- 1 red pepper diced
- 1 green pepper diced
- 2 jalapeƱos, seeds removed then minced
- 3 stalks celery diced
- 2 cloves garlic minced
- 1 28 ounce can diced tomatoes
- 1 - 2 teaspoons Louisiana hot sauce
- 1 tablespoon Cajun Seasoning
- 1 teaspoon file powder
- Salt and Pepper
- Green onions for garnish

The Process
1. In a dutch oven over medium heat add 1 tablespoon of the peanut oil and add the sausage. Cook until the sausage is browned on all sides. With a slotted spoon remove the sausage from the pan leaving all the drippings. Then add the chicken cook until all sides are browned and chicken is done. Then using the same method as the sausage remove from the pan using a slotted spoon and set aside.
2. Add the remaining tablespoon of peanut oil add the onion, red pepper, green pepper, jalapeƱos, celery and garlic to the pan. Cook until the onions become translucent and they veggies have released all their liquid. Add the tomatoes and hot sauce and bring to a boil.
3. When simmering add the reserved chicken and sausage plus the Cajun seasoning and file powder to the pot. Season with the salt and pepper and return to a boil. When simmering reduce heat to a simmer, cover and continue cooking for 45 - 60 minutes.
4. Serve over noodles or white rice and garnish with green onions.
5. Enjoy!!!