Thursday, September 30, 2010

Chicken Parmesan Sandwiches

Chicken Parmesan Sandwiches

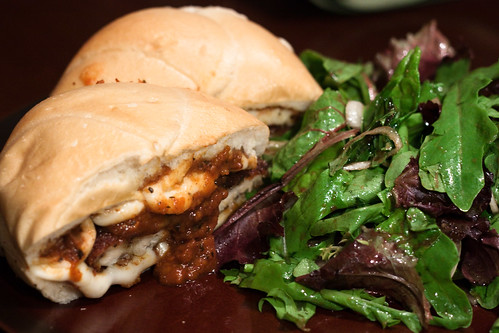
Chicken Parmesan is a dish I have always had served over pasta and traditionally that's the case. The first time I put it on a roll and served it as a sandwich I was in heaven. You can still serve it over pasta if you like but this method is Superior in my opinion. Also experiment with the bread as well you can use baguettes, kaiser rolls, hoagies, french bread, they all work well. My recipe for marinara sauce can be found here. You can serve this sandwich with anything from fries to salad. Hope you like it. If you have any questions please feel free to email me. I love talking about food.

Ingredients
- 4 boneless, skinless chicken breast
- 4 kaiser rolls
- 1 teaspoon kosher salt
- 1 teaspoon fresh ground black pepper
- 1 teaspoon garlic powder
- 1 cup all purpose flour
- 3 eggs beaten
- 2 cups Italian bread crumbs
- 8 slices mozzarella cheese
- 2 cups of your favorite marinara sauce
- olive oil for frying

The Process
1. Take each chicken breast and place between 2 pieces of plastic wrap. Then using a meat mallet, pound out each chicken breast until it's about 1/2 an inch thick evenly.
2. Place the flower, eggs and bread crumbs in their own individual shallow pans and make an assembly line. Season each chicken breast with salt, pepper and garlic powder. The take the chicken and dredge in flour, then egg, then breadcrumbs, shake off any excess then set aside. Do this for each piece of chicken.
3. Heat 1/2 an inch of olive oil in a heavy bottom pan such as a cast iron skillet over medium heat. Also set your oven to broil. When the oil is hot, place the chicken pieces in one at a time, usually 2 at a time, and fry on each side for about 5 minutes until chicken pieces are golden brown. Take out of oil and place on paper towels to cool.
4. Take the rolls and cut in half, then smother each side of the roll with marinara sauce like you would mayo. Then place a piece of cheese on each half roll. Place in oven cheese side up, until each piece has it's cheese melted and it's golden brown.
5. To assemble the sandwiches, take to roll halves, place a chicken piece on it, cover with a little more marinara then put the other roll half on top. Cut in half and serve.
6. Enjoy!!!

3 Garlic Marinara Sauce

Marinara

When it comes to marinara sauce I have never found a bottled that I really liked. So naturally I had to come up with my own. This recipe may seem a little strange but the end result will not disappoint. I uses this stuff for dipping sauce, pasta dishes, pizza or anything else that calls for a meatless red sauce.

This process takes a little bit but it's really easy. When you chop the veggies for roasting don't worry about making them uniform, they are all going to get roasted off then pureed. Also from what I have learned watching Alton Brown you should use a blended red wine when cooking. I used a Shiraz Cabernet which worked out perfectly. Also the canned tomato sauce I use is crushed because I like a smooth marinara. You can used tomato sauce, diced, stewed or whatever you like. One more thing and that's roasted garlic can found in your produce section. If you have any questions don't be afraid to ask.

Ingredients
- 10 carrots peeled and roughly chopped
- 10 stalks celery, roughly chopped
- 2 onions, paper skins removed and roughly chopped
- 3 tablespoons olive oil, divided
- 1 3/4 cups of red wine, divided
- 8 cloves garlic, minced
- 1/2 teaspoon red pepper flakes
- 2 28 oz cans of crushed tomatoes
- 2 tablespoons roasted garlic
- 1 tablespoon dried oregano
- 1 tablespoon dried basil
- 1 teaspoon sugar
- 1 teaspoon garlic powder
- 1/4 cup Parmesan cheese
- 2 - 3 teaspoons kosher salt
- 1 teaspoon fresh ground black pepper

The Process
1. Preheat oven to 400 degrees. Take the carrots, celery and onions and place in a roasting pan. Cover with 2 tablespoons of olive oil and season with salt and pepper. Roast in oven until the carrots are soft, stirring occasionally about 45 minutes. Set aside and let cool. When veggies are cooled place in blender or food processor with 1/4 cup of red wine and puree until smooth. Set aside.
2. Heat the remaining tablespoon on olive oil over medium heat in a large sauce pan. Add the minced garlic and pepper flakes and saute for about a minute. Add the remaining 1.5 cups of wine and let reduce for 5 minutes. Add the reserved roasted vegetable puree, tomato sauce, roasted garlic, oregano, basil, sugar, garlic powder and Parmesan cheese. Add the pepper than season with the salt until it tastes about right. Bring to a boil then reduce heat to low and simmer for 30 - 45 minutes stirring occasionally. Make sure to cover because it will spit up.
3. Remove from heat and use for whatever you like. You can freeze it into individual servings when done it's keeps for quit a while.
4. Enjoy!!!

Wednesday, September 29, 2010

Chicken Katsu

Chicken Katsu

Chicken Katsu is one of those dishes I usually get as a combo with my teriyaki. It's crunchy texture, juicy chicken and tangy sauce makes for a killer dish. The thing that always gets me when ordering it from a restaurant is that they really don't pay much attention to the chicken itself, they just kind of bread it and deep fry it and leave it up to the dipping sauce to supply all the flavor. That's what I have changed with my recipe.

I take my boneless, skinless chicken thighs (or you could use pork cutlets or chicken breast) and marinade it in a soy based sauce for about an hour or so. That makes it so when you bite into it, you get crunchy then a nice sweet, savory taste behind it. Hope you all like it let me know what you think.

Marinade
- 1 cup soy
- 1/4 cup honey
- 1 tablespoon chili, garlic sauce
- 1 tablespoon sesame oil

Sauce
- 1 cup ketchup
- 1/2 cup Worcestershire sauce
- 1/4 cup mirin
- 2 cup red rice wine
- 1/4 cup brown sugar
- 2 tablespoons ginger, minced
- 2 tablespoons garlic, minced
- 1 teaspoon peanut oil

Chicken
- 8 to 10 boneless, skinless chicken thighs
- 2 cups panko bread crumbs
- 1 cup mochiko flour
- 4 egg whites, whipped until frothy
- peanut oil for frying

The Process
1. Combine all the ingredients for a marinade in a medium sized bowl and mix well. Add the chiken, stir well to make sure the chicken is evenly coated, then place in fridge for 1 hour to overnight.
2. While the chicken is marinating combine the ketchup, Worcestershire sauce, mirin, rice wine and sugar in a bowl and stir with a wire whisk until the sugar has dissolved. In medium sauce pan over medium heat heat the peanut oil until hot. Add the ginger and garlic and saute until fragrant, about 1 minute. Add the ketchup mixture and bring to a boil. When boiling, reduce to a simmer, cover and let reduce for about half an hour. Remove from heat and set aside.
3. Get 3 medium sized, rimmed containers and place panko in one, egg whites in another and the flour in the last. Heat the peanut oil, about 1/2 an inch, in the bottom of a heavy bottom pan such as cast iron over medium heat. While the oil is heating up take the chicken and drain off the excess liquid. Take each piece of chicken, place in flour until evenly coated, shake off excess flour then place in egg whites until coated, then place in panko until completely covered in the breading. Repeat for each piece of chicken.
4. When oil is heated, add the chicken and fry on each side until the breading is golden brown on each side about 5 minutes per side. Take the cooked pieced and place on a paper towel to allow to cool for about 5 minutes.
5. Take the chicken and either slice it into strips or leave it whole. Serve over rice along with the sauce in a small bowl or ramekin.
6. Enjoy!!!

Getting Used to my new Camera

Kishelle

For those who don't know I upgraded from a Canon XTi an entry level camera to a Canon 50d which is an intermediate level DSLR. It has a whole new interface that I am still getting used to and a ton of new features. It has been tough but in a week I have taken some 900 pictures. So check them out and let me know what you think.

Direct Link

Monday, September 27, 2010

4 Bean Chili

Chili

Chili is something that's good no matter what time of year or what kind of mood you are in. However as the weather gets colder here in dreary old Washington state, chili sounds even better. This recipe isn't traditional, i.e. it has beans in it, but it's still killer. Let's be honest how many people actually prefer chili that doesn't have beans in it? I always thought that chili required beans until I started really getting into cooking and found out that traditionally it's served meat only. Regardless my chili always has beans in it. You can put it on anything too hot dogs, burgers and tater tots which all get better with a spoonful of this meaty and beany goodness.

The recipe is pretty straight forward. The "strange" ingredients are the beer which can be anything but I always use some sort of dark Mexican beer like Negro Modelo. The other one is the chipotles in adobo which can be found in the Spanish section of your super market. When you add this to the chili make sure not to add too much because it is an extremely powerful and prominent item. What I recommend is putting half of what the recipe calls for in, then taste it and continue this process until you can recognize the chipotles on your pallet. If you need more just add a little more until you like it.

Also the tomato juice and corn are optional. This chili comes out pretty thick and some people prefer a tinner chile if that's the case, then add some tomato juice. What I recommend is that you take all the other ingredients and add them first then add the tomato juice if you want.The corn is also good but I only usually put it in there if I can get it fresh. The frozen and canned stuff is not that good. Hope you like it.

Ingredients:
- 1 lb 80/20 ground beef
- 1 lb hot or mild country sausage
- 1 tablespoon of peanut oil
- 2 sweet onions chopped
- 1 red pepper chopped
- 1 green pepper chopped
- 1 yellow/orange pepper chopped
- 2 cloves garlic minced
- 1 tablespoon pepper flakes
- Jalapenos, serranos, habaneros (all based on personal preference) diced(the more seeds you leave in the hotter if will be)
- 1 12 ounce beer I prefer Negro Modelo
- 2 28 oz cans crushed tomatoes
- 1 can tomato paste
- 1 - 2 cups tomato juice (V8) optional
- 3 - 4 chipotles in adobo, pulsed through a food processor
- 4 cans of beans whatever kind you like (I use kidney, pinto, black and garbanzo) drained and rinsed (or you can use dried beans but make sure to soak them overnight)
- 1 cup yellow corn fresh or frozen (2 ears if fresh or half a frozen bag based on preference) optional
- 1/4 cup + 1 tablespoon chili powder
- 1/4 cup new mexico chili powder
- 1 tablespoon cumin
- 1 teaspoon Mexican oregano
- Salt and Pepper to taste

The Process
1. Heat peanut oil in a large pot over medium heat then add beef, sausage, onion, peppers, garlic, hot peppers and pepper flakes then sauté until the meat is cooked about 10 minutes. Make sure to use a spatula so that you can break up the meat as it cooks.
2. Deglaze plan with the negro modelo using the spatula to get any little bits that stuck to the bottom of the pan about 5 minutes.
3. Add the cans of the crushed tomatoes, beans, tomato juice, chipotles, beans and corn then stir thoroughly. Then add the tomato paste until you get the consistency you desire. Bring to a simmer about 10 minutes.
4. Add the chili powders, cumin and oregano and stir. Then season with salt and pepper and taste it to make sure it tastes how you like it. If it’s not chili tasting enough, add more chili powder, if all the flavors are mild add more salt. If it’s not hot enough add some cayenne pepper, if you can't taste the cumin add a little more.
5. Bring to a simmer for 1 – 4 hours.
6. Serve in a bowl with shredded cheddar, a dollop of sour cream and minced onions.
7. Enjoy!

Like always if you have any questions please email me.

Friday, September 24, 2010

Chicken Pot Pie

Chicken Pot Pie

I love pies in all shapes and sizes but a hearty chicken pot pie is the definition of comfort food. It's warm, filling and tasty to the very last bite. Not to mentions it's surprisingly easy to make. All you really do is make chicken soup, thicken it up and place some sort of crust on top of it then bake it. Easy as pie. Here is my rendition of this classic pie where I use puff pastry for the crust which always turns out flaky and delicious. They sell puff pastry in the freezer section of your favorite supermarket right next to the pre made pie crusts. Please let me know if you have any questions.

Ingredients
- 1 onion diced
- 5 stalks celery diced
- 6 carrots peeled and diced
- 4 cloves garlic minced
- 1/4 pound green beans chopped
- 2 ears white corn, husk and kernels removed
- 1/4 pound mushrooms quartered
- 1 cup frozen peas
- 2 teaspoons fresh thyme minced
- 4 tablespoons butter (1/2 stick)
- 2 cups milk (2% or higher)
- 3 cups good chicken stock
- 2 tablespoons chicken base
- 1 teaspoon poultry seasoning
- 1 - 2 teaspoons kosher salt
- 1 teaspoon fresh ground black pepper
- 1 whole roasted chicken roasted and meat shredded
- slurry of cornstarch and water (2 parts water, 1 part cornstarch)
- 1 package (2 sheets) puff pastry
- 1 tablespoon of melter butter

The Process
1. Take your puff pastry out of the freezer and set on the counter to defrost and also preheat your oven to 350 degrees. Meanwhile, over medium heat heat 1 teaspoon of olive oil in a large pot then add the onions, celery, carrots, garlic, green beans, corn and peas, stir to combine. Sauté for about 8-10 minutes or until all the veggies have released their liquid. Stir in thyme and unmelted butter and cook for 2 additional minutes.
2. Add milk, chicken stock, chicken base, poultry seasoning, and salt, pepper and shredded chicken and bring to a boil over medium high heat. When boiling reduce heat to low and simmer for about 20 minutes or until all the veggies are soft.
3. Bring heat back up to medium and stir in part of your slurry making sure to continually stir while it gets completely mixed in. If it isn't thick enough add some more, then a little more, then a little more until you get the thickness you are looking for. It should be pretty tight as far as the consistency.
4. Add your pie filling to 4 individual bowls and set aside. Take the puff pastry and cut into squares large enough to cover the bowls then place on top of the bowls. Place your 4 bowls on a cookie sheet and brush with melted butter. Then poke 3 - 4 holes into each pie with a knife to allow for the steam to escape.
5. Bake for 35 - 45 minutes or until the puff pastry is nice and golden brown. Be careful when you take them off the pan they are going to be crazy hot. Let stand for about 10 minutes. Serve with a little bit or black pepper and Tabasco.
6. Enjoy!!!

If you have any questions please feel free to email me.

Thursday, September 23, 2010

Scratch Made Chicken Teriyaki

Teriyaki Chicken

Chicken teriyaki is one of my all time favorite things to eat. It is crazy good and whenever I go to some teriyaki joint, I make sure to either get a plate full of it or half a plate with something else that's pretty good. The kicker for me is that it's grilled and you get the sugar all crystallized and the smokiness of the grill. Man I am getting hungry right now.

This recipe is pretty universal and can be used to marinade all different kinds of things. I used boneless skinless chicken thighs but I have had success with regular chicken thighs, skirt steak, pork, tofu basically anything. You make this sauce and put some form of protein in it and place in the refrigerator for a couple of days and I guarantee you will love the results.

The only strange thing on the ingredient list is the sweet soy sauce but don't fret, they sell this stuff at your favorite grocery store. It will most likely say exactly that, Sweet Soy Sauce, and be in a red bottle (mostly). It should have the consistency of molasses.

Ingredients
- 1 cup soy sauce
- 1 cup of brown sugar
- 1/4 cup rice wine vinegar
- 1/4 cup sweet soy sauce
- 1 tablespoon chili garlic sauce
- 1 tablespoon sesame oil
- 1/2 cup pureed pineapple (about 1/2 a can or a 1/4 of a fresh pinapple)
- 6 cloves garlic, skin removed and roughly chopped
- 2 inches of ginger root, sliced
- 6 green onions, roughly chopped
- 1/2 medium onion, sliced
- 2 pounds of boneless, skinless chicken thighs

1. Take the soy sauce and brown sugar and place in a bowl and mix with wire whisk. When the sugar has completely dissolved add the vinegar, sweet soy, chili garlic sauce, sesame oil and pineapple puree. Mix well.
2. Place the garlic, ginger, green onions, regular onions and chicken in a resealable bag. Make sure to mix the chicken around with the veggies. Pour the sauce into the bag with and seal the bag trying to get as much air out as possible. Make sure all the chicken is covered with the marinade. Place in fridge for 2 days.
3. Preheat your grill for direct heat. Remove the chicken from the bag and set aside. When the grill is hot, place the chicken directly on the heat. Flip once when the side down has nice grill marks on it. It should take about 4-5 minutes per side. Remove pieces when they are done and when all are finished, cover plate in foil and let rest for 5 minutes.
Optional Step. Take the marinade, strain it, boil and then reduce by half.
4. Slice the chicken and serve over rice with optional sauce. Garnish with sesame seeds and green onions.
5. Enjoy.

If you have any questions please feel free to contact me.

Wednesday, September 22, 2010

Homemade Chicken Noodle Soup

Chicken Noodle Soup

Chicken Noodle Soup is one of my all time favorites when it comes to soup. You might have seen in my previous posts that I alway say X amount of cups of good chicken stock. What I am referring to is homemade chicken stock which I suggest you make for this recipe. Trust me it's worth the effort and people will think you're cool I hope. If you don't want to make it just skip the first recipe and use your favorite chicken broth and the rule of thumb is, the more you pay the better it is kind of like whiskey and mail order brides (just kidding baby).

Now when you first look at how to make this it might seem a little intimidating. You are going to spend a little time on this but let me tell you the benefits, are numerous. You get a much better tasting dish for whatever you are using this for and much deeper and richer flavors. When you buy broth canned you get a liquid that has chicken base dissolved into it and ends up looking somewhat clear. They don't take the time to actually boil bones until the flavors have been infused with the water. You can freeze what you don't use or even better, freeze it in ice cube trays and pop one into whatever you are cooking when you need a little stock. Jussayin.

Home Made Chicken Stock

Ingredients
- 2 large onion chopped
- bulb garlic
- bunch celery
- 10 carrots
- 1 tablespoon whole peppercorns
- 4 bay leaves
- water
- 2 pounds of chicken bones
- EVOO
- Salt and Pepper

1. Chop up all the veggies and place in a large stock pot. Don't worry about peeling the carrots or de-skinning the garlic and onions it's all going to get strained out in the end. Add the peppercorns and bay leaves to the pot as well. If you have fresh herbs in your yard add those are well. It's all good.
2. Add all the bones and carcass to the pot.
3. Fill stock pot with water until 1 inch below the top of the pot. Place pot on stove and bring to a boil uncovered. When boiling, reduce heat to a simmer, cover with a lid and simmer for 8 hours then let stand for 4 hours. Best to do before you go to bed so you can do the next step in the morning.
5. In another large stock place a strainer on the inside of the empty pot. Making sure not to burn yourself, dump the liquid through the strainer into the new pot. Place the strained liquid into the fridge until completely cooled and a layer of fat has congealed at the top.
6. When the liquid has cooled and using a spoon, scoop all that white fat from the top of your soup and discard.
7. You are done!!! Use in any recipe that requires chicken broth or stock. Now this hasn't been salted yet so make sure that you season whatever you use this in. Can be frozen. Enjoy.


Chicken Noodle Soup

Ingredients
- 2 medium onions diced
- 6 stalks celery diced
- 8 carrots, peeled and diced
- 4 cloves garlic, minced
- 1 tablespoon olive oil
- 2 teaspoons fresh thyme minced or 1 teaspoon dried thyme
- 2 tablespoons chicken base (only necessary if using homemade stock above)
- 10 cups of good chicken stock
- 1 whole roasted chicken roasted and meat shredded
- 8 ounces egg noodles

1. Heat olive oil in large pot over medium high heat and add onions, celery, carrots and garlic and sauté until veggies release their liquid about 6 - 8 minutes. Add the thyme and cook for another 1 minute until fragrant. It should be smelling awesome.
2. Add the chicken, chicken base and chicken stock. Season with salt and pepper and bring to a boil. Then reduce to a simmer and cover and cook for 20 minutes until veggies are soft.
3. Meanwhile, bring a pot of water to a boil and cook the egg noodles. When the noodles are done, drained and the veggies are soft, add the noodles to the soup and simmer for 5 more minutes.
4. Ladle into bowls and serve with grilled cheese. Top with freshly ground pepper and a little Tabasco to give it a kick.
5. Enjoy!!!

Any questions please feel free to email me.

Tuesday, September 21, 2010

Hawaii 2010

Flowers

It has been quit a while since I went to Hawaii. It has also been a while since I have spent some significant, alone time with the one I care about the most that being my beautiful wife. Not to mention that we didn't have a honeymoon last year when we got married and that sucked. So we decided that this year we would go all out. We went to Kona on the Big Island of Hawaii. We were there for 8 days and we did a ton of shit. We went to the volcano, ate an insane amount of raw fish and local (Hawaiin) food, beach hopped, snorkeled, swam, laughed, sang karaoke, drank, swam with turtles, went to a luau and a snorkel tour and say family and friend. We seriously put 700 miles on our rental car. It was the most amazing trip I have ever been on. We had too much fun.

The kicker was getting to meet my wife's dad during our layover. This was my first time getting to meet the guy and he was super cool. I feel more complete know and whole knowing the other half the best story in my life. That really made the trip. So check out the new pics and let me know what you think.

Direct Link

New Camera, New Pics

Old Truck

I have upgraded to a new camera and let me tell you, it's pretty awesome. With my new to me Canon 50D I jumped from 10.0 mp to 15.0 mp which is great but the kicker is the big jump in my shutter speed and the increased low light options. I should have this camera for a while and now need to get some new lenses. The one I have is great and I love using it but I would like to get a macro lens and something that shoots really great pics from far away. We'll see what happens.

Anyways check out my new pics and let me know what you think. As always if you want one let me know and I will email it your way. Thanks for checking them out.

Direct Link

Monday, September 20, 2010

Chicken Marsala

Chicken Marsala

This is one of my favorite all time dishes to order from an Italian restaurant. The mushrooms, the wine, the accompanying pasta it's all so good. It's crazy easy to make too, I'm serious. So simple, so good. Just make it. If you have any questions please feel free to email me.

Ingredients
- 4 chicken breasts, filleted into 2 pieces
- Salt and Pepper
- 8 tablespoons (1 stick) butter
- 1 teaspoon garlic powder
- 1/2 cup all purpose flour
- 1 pound of button mushrooms sliced
- 1 cup Marsala wine
- 2 cups good chicken stock
- 1/4 cup cream

1. Heat 4 tablespoons of butter in a large saute pan over medium heat. Take the chicken pieces and season with salt, pepper and garlic powder. Place flour in a flat dish and dredge the chicken in it. Shake off excess flour and set aside.
2. When butter is melted add your dredged chicken and cook until both sides are golden brown about 4 - 5 minutes per side. Remove chicken from the pan and set aside.
3. In same pan add the mushrooms and sauté until the mushrooms have released all their liquid about 8 minutes.
4. Add the wine and scrape all the little pieces off the bottom of the pan. Simmer until liquid has reduced by half. Add the chicken stock, remaining 2 tablespoons of butter and cream. Season with salt and pepper and bring to a boil over medium high heat.
5. When the sauce is boiling reduce the heat to medium low and return the chicken to the pan making sure all the chicken pieces are submerged in sauce. Cover and simmer for 30 minutes.
6. Remove pan from heat. Add precooked pasta to your plate, then take 2 pieces of chicken and set on the noodles. Ladle the sauce over the noodles. Garnish with parmesan cheese.
7. Enjoy!!!

Tuesday, September 14, 2010

Sweet and Sour Pork

Sweet and Sour Pork

Okay so I know that most people have a phobia about cooking any sort of Asian cuisine but it's not that tough. As soon as you get a couple of items in your pantry from your local Asian supermarket you will be good to go. Now this is a good recipe for Sweet and Sour Sauce and can be used as a dipping sauce, a wing sauce or on meatballs. You can also substitute the pork for steak, chicken or tofu. Now the breading on this recipe isn't super thick but does an excellent job of sucking up the sauce. Seriously, it's super good I highly recommend it. Please email me if you have any questions. Enjoy everyone.

For Marinade
- 1 pound pork cut into 1 inch cubes
- 1 tablespoon soy sauce
- 1 tablespoon white rice wine
- 1 teaspoon sesame oil
- 1 tablespoon corn starch

The Stir Fry
- 1/4 cup mochiko flour (found in the Asian section of your favorite supermarket)
- 2 red peppers sliced 1 inch thick then cut on the bias
- 1 onion sliced
- bunch of green onions cut on the bias
- 2 cups cubed pineapple or one 14 oz can drained
- Peanut oil for frying

The Sauce
- 1/2 cup pineapple juice
- 1/2 cup ketchup
- 1/2 cup packed light brown sugar
- 1/4 cup apple cider vinegar
- 1/4 cup water
- 4 teaspoons soy sauce
- 2 teaspoons red pepper flakes
- 1 teaspoon sesame oil
- 1 tablespoons vegetable oil
- 2 tablespoons minced ginger
- 2 teaspoons minced garlic
- 1 tablespoon cornstarch
- 2 tablespoons sherry

1. Combine all the ingredients for the marinade in a bowl with meat and marinade in fridge for one hour.
2. Combine the pineapple juice, ketchup, brown sugar, vinegar, water, soy sauce, pepper flakes, and sesame oil.
3. In a medium saucepan, heat 1 tablespoon of the oil over medium-high heat. Add the ginger and garlic, and cook, stirring, for 15 seconds or until fragrant.
4. Add the pineapple juice mixture and bring to a boil. Reduce the heat and simmer, stirring, until the sugar dissolves, 2 to 3 minutes. Don't worry if it's super runny we are going to thicken it up on the next step.
5. In a bowl, dissolve the cornstarch in the sherry and make a slurry.
6. Add the slurry to the simmering sauce and whisking constantly. Reduce the heat and simmer until thickened, 2 to 3 minutes. Remove from the heat and set aside.
5. Heat up your deep fryer to 350. If you don't have a deep fryer add 2 inches of peanut oil to the bottom of a wok over medium high heat. If oil starts to smoke turn it down.
6. Combine mochiko flour with the marinaded pork. Basically you are looking for all the pieces of meat to be covered in the flour.
7. When oil is heated shake off excess flour and fry in batches until the pork is golden brown. Remove from oil and set on paper towel aside.
8. Take wok and remove all but 1 tablespoon of oil and return to medium high heat. Add your pre-chopped veggies and saute for 5 minutes until they start to sweat.
9. Add the sauce and pork to the work and stir until sauce is covering everything.
10. Remove from heat, garnish with sesame seeds and serve over white or brown rice.
11. Enjoy!!!