Thursday, December 30, 2010

My day off

I have not been to work since December 23rd and I finally got a day where I didn't really have anything to do. So guess what I did? I made stuff.

Freezer Jam

The first thing I made was freezer jam. Now I know that's something that dudes don't normally do but if you are raised on the stuff and try to find a store equivalent you are going to get let down. Not to mention that those Smuckers guys jam sucks. So I went to the store and got some organic frozen black berries and some pectin and followed the recipe and before I knew it I had jam. The only thing to remember is that you need to follow the recipe to a T. If you don't do what it says you will get bad results.

Bread Pudding

Challah Bread

The other thing I made was bread pudding. I have been dabbling in the idea of making deserts now for a while and I finally started. This recipe I got from a buddy who has a subscription to Cook's Illustrated and it was spot on. The cake was spongy and rich and delicious. The awesome grocery store up the street even had Challah bread which is this sort of weaved sweet bread and you can tell it made a difference. If you've never made it please give it a shot. You will like it.

Thanks for looking everyone I hope you all have a wonderful New Years!

Chicken Fajitas

Chicken Fajitas

This is something that probably should have made it on the cookbook list but it would have been a little premature. I really haven't found a marinating method that gave me that flavor I was looking for. So I did more research and now I think I got it down. The only thing that could have made this better would have been if I cooked the entire meal on the grill but it was snowing yesterday so that was out. The flavor was rich and in hind site I should have marinated it overnight instead of all day. Like always if you have questions or suggestions please shoot me an email.

Kitchen Notes
* You can use whatever kind of meat you like but thighs just happened to be what I had in the freezer.
* You can add more heat if you like by adding more crushed red peppers to the marinade or even some fresh jalapenos to the veggie list.
* If you don't have Mexican oregano then regular oregano will work.
* If you don't have some cheese cloth for your veggies for the marinade then you can just put them directly into the marinade (it's just easier to get the veggies out when they are all tied together).
* If you have leftovers you can take the meat and veggies mixture over medium high with a few eggs and cook until complete and have a killer breakfast burrito.

Ingredients
- 1/4 cup olive oil
- 2 teaspoons chili powder
- 2 teaspoons cumin
- 2 tablespoons lime juice
- 2 tablespoons red wine vinegar
- 1/2 teaspoon cayenne pepper
- 1 teaspoon oregano
- 1 tablespoon kosher salt
- 2 cloves garlic mashed
- 1/4 cup roughly chopped onion plus one whole onion sliced
- 1/4 cup cilantro
- 8 boneless, skinless chicken thighs
- 1 red pepper sliced
- 1 green pepper sliced
- tortillas warmed
- toppings including sour cream, guacamole and shredded cheese

The Process
1. In a large ziplock bag add the olive oil, chili powder, cumin, lime juice, vinegar, cayenne, oregano and salt then mix well. In a cheese cloth add the garlic, 1/4 cup of onion and cilantro then tie it off and add to the marinade. Then add the chicken to the marinade and seal then put in the fridge overnight to 2 nights.
2. In a large cast iron skillet heat a little bit of oil over medium high heat. Then when the pan is hot remove the chicken from the marinade and place in the pan until the bottom side is almost black. Flip the chicken and do the same to the other side adding a little of the marinade if the pan totally dries out (which it doubt). When the chicken pieces are black on both sides (don't worry if they're not cooked through we are going to add it back to the pan later) remove from the pan and place on a cutting board for 5 minutes.
3. Add the veggies to the same pan with a little bit of oil and using a wooded spoon, scrape up all those charred pieced of meat while you stir the veggies for 5 minutes. Slice the chicken into desired lengths and add to the pan and mix well. When the meat is cooked the dish is done. Add some meat mixture to a tortilla with your desired toppings and eat em up.
4. Enjoy.

Wednesday, December 29, 2010

Beef Bourguignon

The Finished Product

Now I know this doesn't sound manly at all but I saw that movie Julia and Julia about Julia Childs. This lady was a cooking star before they even phrased the term. She was like 6 feet tall but just had an amazing talent. So that basically sparked my interest in her and I started doing my research on her and the one recipe that pops up almost immediately when googling her is Beef Bourguignon. It's pretty much a fancy beef stew that has an entire bottle of wine in it. You heard me an entire bottle. So when I got my new Le Creuset French Oven I had to try this out.

The recipe I used is right here and can be found in here Art of French Cooking book that the movie was based around kind of. I pretty much followed it word for word with a few exceptions:

1. I didn't have any excess fat when I was done sauteing the veggies so there was nothing to drain out.
2. Instead of fresh garlic I used 2 tablespoons of roasted garlic (thanks Rachel).
3. I didn't use the herb bouquet when I made the pearl onions (I used fresh ones).
4. It only took mine 3 hours to be done. When it's done the recipe calls for you to remove all the contents of the reduced wine and stock and reduce the sauce even more. Mine was plenty thick already so I didn't have to do that. All I did was stir in my mushrooms and pearl onions and then return to the oven for another 20-30 minutes.
5. I served mine over potatoes but in retrospect I should have used mashed potatoes or even polenta cakes or something.

I can't begin to tell you how wonderful it was. The flavor was rich and deep and even my wife who doesn't eat beef went for seconds. You have to try this. Trust me it's worth the effort. Julia Child's was onto something back then and it's very fulfilling to me to take a recipe that's 40 years old from an icon and make it and completely nail it. You really want to eat this dish I am serious.

My Pictures Link
Recipe Link Again

Christmas Pictures

Tristan

Jess and Shaka

I hope you all had a wonderful Christmas because I know I did. Another benefit of being married is being able to go to more than one houseful of presents in the same day and this also includes food. Christmas Eve was at my Mom's place in Tacoma and Christmas was at my in-laws place in Port Orchard. I took as many pictures as I could but I was super distracted. So I didn't get as many as I could have but I got enough. I did get to watch my 3.5 year old nephew open his MOUNTAIN of presents which was super cool. Then I got to see my new nephew attempt to open presents which was also awesome. So check out the pics and let me know what you think. Enjoy the rest of the holidays and thanks for stopping by.

Direct Link

Wednesday, December 22, 2010

Buffalo Chicken Sandwiches

Buffalo Chicken Sandwich

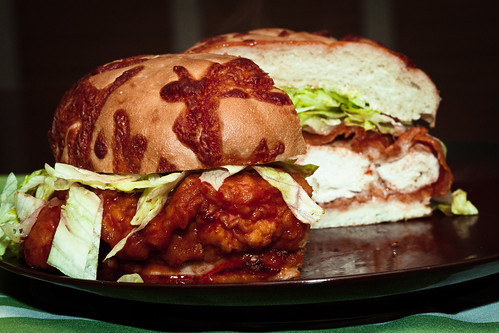
Who doesn't love hot wings? They're crispy, spicy and oh so satisfying. So why not put that in sandwich form you say, well alright I will. I started with chicken breasts, breaded them, pan fried them the dunked them in sauce and put them on a bun covered in lettuce. I was truly happy with the results and I will be making these again. This is pretty much the exact same sauce I use for my hot wings and almost the same way as I do my fried chicken so I was familiar with the process. If you have any questions please let me know.

Kitchen Notes
* There are a million different hot sauces you can use. I like Franks because it does have a nice kick to it.
* You can use whatever buns you would. I used the cheddar kaiser rolls from Safeway they are top notch.
* You can use whatever kind of oil you want to fry them I used canola because it's what I had left over in my pan from the previous day.
* The cayenne pepper is optional for those who love hot food.
* I use ranch as my bun sauce but you can use blue cheese (I haven't acquired a taste for it).
* You should definitely consider taking an old spice container and combining equal parts salt, pepper and garlic powder, mixing it well and using it for like a base seasoning. I believe Paula Dean calls it her house seasoning or something. I use it on everything.
* Makes 4 large sandwiches.

Ingredients
- 4 medium sized boneless, skinless chicken breasts
- salt, pepper, and garlic powder mixed together
- 4 eggs
- 1/4 cup hot water
- 2 cups plus 2 tablespoons hot sauce
- 2 cups all purpose flour
- 1 cup (2 sticks butter)
- 2 to 3 tablespoons honey
- 1 to 2 teaspoons cayenne powder
- oil for frying
- 4 buns
- shredded iceberg lettuce
- ranch dressing

The Process
1. In a cast iron skillet fill with 1 inch of your oil of choice and bring to temp over medium high heat. Mean while make your assembly line. Take your chicken breasts and season with s + p + gp mixture, set aside. In a medium bowl combine the eggs, water and 2 tablespoons of hot sauce and whisk together well, set aside. Add the flour to another bowl, set aside. In a medium sauce pan combine the remaining 2 cups of hot sauce, butter, honey and optional cayenne. Bring to a simmer them remove from heat and place in a glass bowl.
2. When the oil is hot, take the chicken and dunk in the egg, then the flour, then the egg, then the flour. Then place in the oil and fry on each side for about 6 minutes or until it turns a dark golden brown. Flip and do the same thing to the other side. When both sides are done, remove from oil and set on a paper towel for 3 minutes to allow to cool slightly. Do this to all the chicken breast pieces (I can usually do 2-3 at a time).
3. To assemble the toast the buns in the broiler then cover each side with the sauce of your choice. Then dunk the fried chicken in the hot sauce mixture and then place directly on the bottom half of the bun. Cover with the shredded lettuce then the other half of the bun.
4. Enjoy!

Tuesday, December 21, 2010

New Pictures

Shining Skulls Show
Shining Skulls

Date Day
Christmas Lights

So I took a weekend off from taking pictures because of my birthday and all. Trust me I was in no condition to be handling my expensive equipment. Jesus that sounded dirty. Anyways this most recent weekend I was able to take some pics of my buddies band when they had a show in Capital Hill. The show was killer and the pictures I am pretty happy with. Then the next day it was date day with my beautiful wife. It started out in downtown Seattle then we spent the day in Bellevue. We went to the Snowflake Lane then the Bellevue Botanical Gardens for their Christmas lights. It was amazing. I have never seen so many lights. I have been going to Zoo Lights in Tacoma like my whole live and this one was better. I played a ton with my camera to get different effects with the lights. So check them out and let me know what you think. Thanks for looking.

Sweet and Sour Meatballs

Sweet and Sour Meatballs

Everyone knows I am a meatball fanatic. I honestly have 4 different variations of these small to medium sized balls of deliciousness. However they are all sort of an Italian type of dish. So when I saw this type of meatball while browsing Tastespotting.com and immediately put it on the "I have to make this list" I keep. So I did a little research and determined this recipe would be the best for what I was shooting for. I hope you like it and if you have any questions let me know.

Kitchen Notes
* You can use ground whatever to make these but I used beef.
* I used some leftover sweet and sour sauce I had from a previous dish but you can use whatever you want. My recipe is here.
* You can put pretty much whatever veggie you wish in the stir fry so experiment and find what you like.
* Panko bread crumbs can be found in the Asian section of your favorite super market or you can just use regular ones if you like.
* Yields 4 servings

Ingredients
- 1 pound ground beef
- 1 large onion, half grated, half roughly chopped
- 3 carrots, 1 grated, 2 roughly chopped
- 1 egg lightly beaten
- 1 tablespoon soy sauce
- 2 tablespoons oyster sauce
- 2 tablespoon corn starch
- 1 tablespoon chili sauce
- 1/2 cup panko bread crumbs
- oil for frying
- 1 green pepper roughly chopped
- 1 red pepper roughly chopped
- 1 bunch green onions roughly chopped
- 1/2 a 20 ounce can pineapple chunk
- 1 cup sweet and sour sauce
- white rice for serving

The Process
1. In a mixing bowl combine the ground beef, grated onion, grated carrot, egg, soy, oyster sauce, corn starch, chili sauce and brad crumbs and stir to combine. Then form into 1 inch balls about 1/2 of the size of a golf ball. Then place a cast iron skillet or saute pan on the stove over medium high heat and add enough oil to come half way up the pan. When the oil is hot add the meatballs one at a time to the pan (it took me 2 batches) and cook for about 5 minutes. Then using 2 forks flip the meatballs over and allow the other side to cook about another 4 minutes. Remove from the oil and place on a paper towel covered plate.
2. Add a tablespoon of oil to a large work over high heat. Add the other half of the onion, 2 sliced carrots, green pepper, red pepper, green onions and pineapple and stir fry for about 5 minutes or until the veggies start releasing their liquid. Then add the reserved meatballs and the sweet and sour sauce and cook for about 2 minutes stirring to make sure everything is mixed together. Remove from heat.
3. To serve plate a ball of rice in the middle of the plate and scoop over a few ladle fulls of stir fry. Garnish with sesame seeds and hot sauce if desired.
4. Enjoy!

Monday, December 20, 2010

Who am I kidding?

Homemade pasta, my first time ever
Homemade Pasta

Chicken Alfredo with scratch made linguine
Chicken Alfredo

Scratch made veal raviolis with a basil cream sauce
Scratch Made Veal Raviolis

I am not going to lie I have been having blog withdrawls. Don't think for a second I have stopped cooking because that couldn't be more false. For the past few months I have been blogging almost daily with recipes that I would make during the week. Now I didn't really realize how much I truly enjoyed until I took a break from it. I am jonesing for it you guys. So I might not be blogging as much as I used to but the recipes will keep coming. Basically it will be things I haven't made before or modifications of previous recipes. Also if you think about something that you would like me to make then send me an email or leave me a comment. I am always open to trying new things so send me ideas.

That being said I got some new toys in my arsenal thanks to my awesome friends and family. For my birthday I got a Le Creuset enameled French Oven (same as a dutch oven only porcelan lined) like this one. Let me tell you this thing is amazing. You get such rich flavors from it and you can just throw it in the oven and braise something forever. Seriously the nicest pan I have ever owned and I asbolutely love it. The seond piece of hardware I received was a pasta roller like this one here. Now I have always wanted to make pasta but didn't have this tool but now I do and let me tell you it's worth the extra effort. The pasta you end up with is so delicate and delicious it's crazy.

So Merry Christmas everyone I hope you all have a wonderful holiday season. I am going to keep writing the recipes and taking pictures so stay tuned.

Tuesday, December 14, 2010

Time Off

So for the past 3 months or so I have been writing recipes like crazy and it has proven to be not only challenging what rewarding. People started making my food and I started getting tons of feedback which was truly awesome. Now the reason I started kicking it into high gear was because I wanted to write a cookbook for my friends and family. I have received a ton of support from everyone which has been humbling and much appreciated. I have about 50 - 60 recipes and pictures for each and I think I am ready to knock this out.

So for the next few weeks I am going to focus on getting all of these recipes in a format that I can submit to Create Space. Create Space is an Amazon company that lets everyday people like me publish their work online. People can then order books from them and I don't have to worry about inventory or anything like that. It's going to be awesome. You can read more about it here.

When I am done and the book is out I will start cooking again making things I haven't made before and the blogs will continue. I have a list of about 30 items I want to make and I am also going to start making deserts. So keep your eyes open my friends I haven't forgotten about you. I am still available for emails and questions so feel free to keep in touch. Have a great Christmas and New Years and I will talk to you all soon.

Christian

Thursday, December 9, 2010

Chicken and Black Bean Quesadilla

Chicken and Bean Quesadilla

If you don't know by know quesadillas are one of the best appetizers you can get when you go to a Mexican restaurant. The crispy shell, the gooey cheese and whatever else comes in them make them the premier finger foods of the genre. Now you can put whatever you want in these and I really do mean everything. Also you can use whatever cheese you want as well. The only thing I recommend is using 8 inch max size for your tortillas. The bigger they are the harder they are to flip so in this case don't go too big. Hope you like them please let me know if you have any questions.

Ingredients
- 1.5 pounds boneless, skinless chicken thighs
- 2 cups chicken stock
- 2 bay leaves
- 1 tablespoon salt
- 1/4 cup cilantro
- 1 teaspoon cumin
- 1 teaspoon chili powder
- 1 teaspoon salt
- 1 teaspoon red pepper flakes
- 1/2 teaspoon chipotle powder (optional)
- 10, 8 inch flour tortillas
- 4 cups shredded cheese (I used cheddar)
- 1 can black beans, drained and rinsed
- any sort of dipping sauce mine can be found here

The Process
1. Take the chicken thighs, chicken stock, bay leaves salt and cilantro and add to a medium sized sauce pot, cover and bring to a boil. Then boiling, reduce heat to low and simmer for 1 hour. Then remove the chicken from the pot and set on a plate to cool. Also reserve 1/2 cup of the liquid that the chicken was boiled in. When the chicken is cool enough to touch, shred it using your hands and set aside.
2. In a medium saute pan, add the chicken, reserved cooking liquid and the rest of the dry seasonings and cook on medium high for 5 - 8 minutes or until all the liquid has evaporated. Now you are ready to assemble some quesadillas.
3. In a large cast iron skillet turn the heat onto medium low and add a liberal spritz of Pam or other kind of oil to prevent it from sticking. When the pan is hot, add a tortilla, then some cheese, chicken, beans then some more cheese and then cover with the other tortilla. Spray the top tortilla with the Pam and when the bottom half is done, it will be golden brown, very carefully flip it and cook the other side. The the bottom side is done set on a plate to allow to rest for 1 minute. Repeat until you have as many as you want.
4. Slice into triangles using a pizza slicer and enjoy!

Tuesday, December 7, 2010

Pinks and Sunday

Sipping some Starbucks

You go first

So these guys got to come to my shoot last weekend but not before they enjoyed some coffee with me. So here are a few pics of them doing what they do, chilling out and looking cool. Let me know what you think.

Skateboarding Pics = Awesome

Skateboarding

So I got to take some pictures of my coworkers son and his buddy at the skatepark in Bellevue this last weekend. The sun was out, the concrete was dry, it was a good day for skating. I skated for years but as I have gotten older I have found that falling hurts much more than it used to. So now I stick to longboards and just focus on going fast. That being said I have always wanted to take pictures of skateboarders. I used to love looking at skate magazines and looking at all the cool photography of crazy people doing things that I would never do. So this was a huge bonus for me plus I got paid for the first time which was kind of cool. So check these pictures out and let me know what you think. I hope you all are doing well and are getting jazzed for Christmas, I know I am.

Direct Link

Friday, December 3, 2010

Trying Something New

Sunday & Pinks

So I always look at pictures on Flickr and the numerous sites I visit every day. I have noticed that a few photographers have these little toys they take around and take pictures of. I think that is a killer idea because you can sort of take these toys on adventures and photograph them So I thought I would give it a shot. I ordered a few cute little toys from Kid Robot and they showed up yesterday. Now I am going to take them around with me and put them on all different kinds of things and snap shots of them. I decided to name them Pinks and Sunday and in the future you will be seeing tons more of them. What do you guys think?

Thanks for looking and have a great weekend.

Corn Chowder

Corn Chowder

So I don't know that Corn Chowder is the best name for this. Maybe Chili Roasted Chicken, Bacon and Corn Chowder would be more accurate but who cares. All you need to know is that it's super good and you should make it. Now you can put whatever you want in this and in retrospect, I would definitely have put in some celery. If you have any questions please let me know.

Ingredients
- 1 whole chicken
- olive oil
- 1 teaspoon chili powder
- 1 teaspoon black pepper plus more for seasoning
- 1 teaspoon kosher salt plus more for seasoning
- 1 teaspoon garlic powder
- 1 pound bacon, diced and cooked until crispy
- 1 onion diced
- 2 sticks of butter
- 3 cloves garlic, minced
- 1 cup flour
- 8 cups milk
- 2 cups chicken stock
- 1 pound of frozen corn kernals or fresh if it's in season

The Process
1. Preheat your oven to 400 degrees. Take your and rub down with oil then season with the pepper, salt, chili powder and garlic powder. Place in oven and cook for about 1 hour and 15 minutes. Remove the chicken and place on the couter and allow to cool. When the chicken is touchable, shred all the meat off the bones and set aside until ready to use.
2. In a medium saute pan, saute the onion with some olive oil over medium high heat until it's sweated. Meanwhile melt the butter in a large soup pot over medium heat. When the butter is melted and simmering, add the garlic and cook for about a minute. Then whisk in the flour in small batches until it's all blended with the butter. Cook for about 5 minutes stirring a lot to cook the flour taste out of the rough.
3. Start stirring the milk into the rough using a whisk to combine the soup. Bring to a simmer then thin out with the chicken stock. When that is simmering stir in the chicken, onion, corn and precooked bacon. Season with salt and pepper then bring to a simmer and continue to do so for 30 minutes. Serve in bowls with a little bit of black pepper.
4. Enjoy!

Thursday, December 2, 2010

Stuffed Meatballs

Stuffed Meatballs

This was one of those dishes when I found out about it I almost slapped myself for not trying it sooner. I mean I love meatballs and I loved stuffed anything so why didn't I put 2 and 2 together earlier in my almost 28 years on this planet. There really is nothing to this recipe. It's basically my meatball recipe I posted before with less eggs and more bread crumbs. These you need to keep their shape or you will get cheese every where. Also the cooking method is different but it's still super easy to make. I hope you like them.


Ingredients
- olive oil for frying
- 1 pound ground italian sausage
- 1 pound ground beef
- 1 onion grated
- 2 eggs, lightly beaten
- 1/2 cup grated parmesan
- 1 teaspoon dried basil
- 1 teaspoon dried oregano
- 1 teaspoon black pepper
- 2 teaspoons kosher salt
- 1 teaspoon red pepper flakes
- a little less than a 1/4 teaspoon nutmeg
- 4 cloves garlic minced
- 1.5 cup bread crumbs
- half a pound of mozzarella cheese cut into cubes
- your favorite marinara sauce or mine found here

The Process
1. Combine the sausage, beef, onion, eggs, parm, basil, oregano, pepper, salt, pepper flakes nutmeg, garlic and breadcrumbs in a large bowl and using your hands, mix well. Take about a golf balls sized chunk of meat and lay in your hand and loosely form a ball. Then take a cube of the cheese and press into the middle of it then form the meatball around it. Make sure to really press down on them to try to get rid of all the creases. Set on a rimmed baking sheet until ready. Do this for the remainder of the mixture.
2. Preheat the oven to 350 degrees and at the same time heat about 1 inch of olive oil in a cast iron skillet over medium heat. When the oil is hot add about half the meat balls to the pan, you don't want to crowd them, and using 2 forks cook them until all sides are browned. Try not to puncture them. When they are all done place the meatballs in the oven to finish cooking.
3. Bake for about 10 - 15 minutes or until the meatballs are done. How you will be able to tell is one or two of the meatballs will start to ooze cheese. When this happens they are all done.
4. To serve place on a plate with noodles and your preferred sauce.
5. Enjoy!!!

Wednesday, December 1, 2010

Turkey Noodle Soup

Turkey Noodle

So this is my final thanksgiving leftover recipes but I have the best for last. Now when you were carving your turkey you hopefully saved your carcass and tossed it in the freezer to eventually make soup. If you did then it's time to take that thing out and get it cooking. This soup has such deep flavor and it's so easy to make you will be hoarding turkey bones for years to come. I also used the last of my turkey in this recipe. So this should really be the last thing you make with your leftover turkey. If you have any questions please feel free to ask.

Turkey Stock
Ingredients
- 1 turkey carcass
- 1 bunch celery roughly chopped
- 10 carrots roughly chopped
- 1 bulb garlic chopped through the equator
- 20 peppercorns
- 5 bayleaves
- 1/4 cup sea salt

The Process
1. In a large stock pot put all the ingredients in it then add water to cover. Place on stove and bring to a boil. Simmer for half 8 - 12 hours on low. Place the pot in the fridge for about 12 hours or until all the fat solidifies on the top. Scrape the fat off then run the stock through a strainer to remove all the bones and veggies. Then pick through the bones and remove any pieces of meat you find and reserve for your soup.
2. Enjoy!


Turkey Soup
Ingredients

- 6 carrots, peeled and diced
- 6 stalks celery diced
- 1 onion diced
- 3 cloves garlic diced
- 10 cups turkey stock
- 2 to 3 cups leftover turkey, roughly chopped plus whatever you reserved from the turkey stock you made
- salt and pepper
- 8 oz egg noodles cooked according to package directions

The Process
1. In a large stock pot add the carrots, celery, onion and garlic and saute for about 5 minutes. over medium high heat. Then stir in the stock and the turkey. Season with salt and pepper and bring to a boil. Reduce to a simmer and cook for about 30 minutes on low. Stir in the precooked egg noodles.
2. Serve in bowls with grilled cheese and a little bit of Tabasco.
3. Enjoy!